Content from What is Git/GitHub?
Last updated on 2024-07-03 | Edit this page
Overview
Questions
- What is Git?
- What is GitHub?
Objectives
- recognize why version control is useful
- distinguish between Git and GitHub
What is Version Control?
Version control is a name used for software which can help you record changes you make to the files in a directory on your computer. Version control software and tools (such as Git and Subversion/SVN) are often associated with software development, and increasingly, they are being used to collaborate in research and academic environments. Version control systems work best with plain text files such as documents or computer code, but modern version control systems can be used to track changes in most types of file.
At its most basic level, version control software helps us register and track sets of changes made to files on our computer. We can then reason about and share those changes with others. As we build up sets of changes over time, we begin to see some benefits.
Benefits of using version control?
- Collaboration - Version control allows us to define formalized ways we can work together and share writing and code. For example merging together sets of changes from different parties enables co-creation of documents and software across distributed teams.
- Versioning - Having a robust and rigorous log of changes to a file, without renaming files (v1, v2, final_copy)
- Rolling Back - Version control allows us to quickly undo a set of changes. This can be useful when new writing or new additions to code introduce problems.
- Understanding - Version control can help you understand how the code or writing came to be, who wrote or contributed particular parts, and who you might ask to help understand it better.
- Backup - While not meant to be a backup solution, using version control systems mean that your code and writing can be stored on multiple other computers.
There are many more reasons to use version control, and we’ll explore some of these in the library context, but first let’s learn a bit about a popular version control tool called Git.
What are Git and GitHub?
We often hear the terms Git and GitHub used interchangeably but they are slightly different things.
Git is one of the most widely used version control systems in the world. It is a free, open source tool that can be downloaded to your local machine and used for logging all changes made to a group of designated computer files (referred to as a “git repository” or “repo” for short) over time. It can be used to control file versions locally by you alone on your computer, but is perhaps most powerful when employed to coordinate simultaneous work on a group of files shared among distributed groups of people.
Rather than emailing documents with tracked changes and some comments and renaming different versions of files (example.txt, exampleV2.txt, exampleV3.txt) to differentiate them, we can use Git to save (or in Git parlance, “commit”) all that information with the document itself. This makes it easy to get an overview of all changes made to a file over time by looking at a log of all the changes that have been made. And all earlier versions of each file still remain in their original form: they are not overwritten, should we ever wish to “roll back” to them.
Git was originally developed to help software developers work collaboratively on software projects, but it can be and is used for managing revisions to any file type on a computer system, including text documents and spreadsheets. Once installed, interaction with Git is done through the Command Prompt in Windows, or the Terminal on Mac/Linux. Since Word documents contain special formatting, Git unfortunately cannot version control those, nor can it version control PDFs, though both file types can be stored in Git repositories.
How can understanding Git help with work in libraries?
- Enables you to contribute to, collaborate on, and support digital research projects
- Enables you to control changes to your files over time without keeping multiple copies of those files
GitHub on the other hand is a popular website for hosting and sharing Git repositories remotely. It offers a web interface and provides functionality and a mixture of both free and paid services for working with such repositories. The majority of the content that GitHub hosts is open source software, though increasingly it is being used for other projects such as open access journals (e.g. Journal of Open Source Software), blogs, and regularly updated text books. In addition to GitHub, there are other Git hosting services that offer many similar features such as GitLab, Bitbucket and Gitee.
How can GitHub help with work in libraries?
- A place to discover and reuse (“fork”) a huge amount of openly licensed digital projects and open source software
- A new and alternative means for publishing content online. Any GitHub repository can have its own project website, blog and wiki using GitHub Pages.
Uses in a Library Context
Consider these common library world scenarios:
Scenario 1: Local library looking to start a crowdsourcing project
A local librarian is looking to put thousands of historical photographs of the area online so that the community can help identify the people and places they depict. She combs the web for examples of existing crowdsourcing projects, and even though they all appear unique to each institution, she notices quite a few seem to have almost the exact same functionality and structure. Rather than build a whole new version from scratch herself, she wishes there was a way to just copy the code of an existing one, and modify it to reflect her project. She notices the GitHub icon at the bottom of one of the projects she likes, but clicking on the link just brings her to a confusing directory of files and oddly labeled buttons such as “Fork”.
GitHub hosts many open-licensed projects and allows any user to fork any public project. By clicking the “fork” button, any GitHub user can almost instantaneously create their own version of an existing project. That “forked” project can be used as the basis for a new project, or can be used to work out new features that can be merged back into the original. (From: GitHub for Academics )
Scenario 2: Multiple people editing metadata for a collection
A metadata specialist has exported a spreadsheet from a repository for cleaning and editing. She’s working with a group of library workers and students, so they need to make sure edits don’t conflict. They also need to be able to undo any edits and preserve the original metadata. Once edits are complete, the whole group wants to review the changes before re-ingesting the spreadsheet of metadata into the repository.
The team can choose to use Git by itself to track changes and resolve conflicts or they can choose to use GitHub to host the project so that users can collaborate and review changes on the Web. Git will preserve the original metadata as well as all edits. GitHub will facilitate discussion about what changes should be made, who should make them, and why.
Key Points
- Version control helps track changes to files and projects
- Git and GitHub are not the same
Content from Getting started with Git
Last updated on 2024-07-03 | Edit this page
Overview
Questions
- What are repositories and how are they created?
- What do
addandcommitmean? - How do I check the status of my repository?
Objectives
- create a Git repository
- track changes to files using the Git repository
- query the current status of the Git repository
Setting up Git
When we use Git on a new computer for the first time, we need to configure a few things. The basic elements of a configuration for Git are:
- your name and email address,
- what your preferred text editor is,
- the name of your default branch (branches are an important component of Git that we will cover later).
To start we will check in on our current Git configuration. Open your shell terminal window and type:
On MacOS, without any configuration your output might look like this:
OUTPUT
credential.helper=osxkeychainOn Windows, without any configuration your output might look like this:
OUTPUT
diff.astextplain.textconv=astextplain
filter.lfs.clean=git-lfs clean -- %f
filter.lfs.smudge=git-lfs smudge -- %f
filter.lfs.process=git-lfs filter-process
filter.lfs.required=true
http.sslbackend=openssl
http.sslcainfo=C:/Program Files/Git/mingw64/ssl/certs/ca-bundle.crt
core.autocrlf=true
core.fscache=true
core.symlinks=false
pull.rebase=false
credential.helper=manager-core
credential.https://dev.azure.com.usehttppath=true
init.defaultbranch=main
If you have different output, then you may have your Git configured already. If you have not configured Git, we will do that together now. First, we will tell Git our user name and email.
Please note: You need to use the same email address in your Git configuration in the shell as you entered into GitHub when you created your GitHub account. Later in the lesson we will be using GitHub and the email addresses need to match. If you are concerned about privacy, please review GitHub’s instructions for keeping your email address private.
Type these two commands into your shell, replacing
Your Name and the email address with your own:
BASH
$ git config --global user.name "Your Name"
$ git config --global user.email "yourname@domain.name"
If you enter the commands correctly, the shell will merely return a command prompt and no messages. To check your work, ask Git what your configuration is using the same command as above:
OUTPUT
user.name=Your Name
user.email=yourname@domain.name
Let’s also set our default text editor. A text editor is necessary with some of your Git work, and the default from Git is Vim, which is a text editor that is hard to learn at first. Therefore, we recommend setting a simpler text editor in your Git configuration for this lesson.
Text editors
There are a lot of text editors to choose from, and a lot of people are enthusiastic about their preferences. Vi and Vim are popular editors for users of the BASH shell. If you will be using Git or the Shell with a group of people for a project or for work, asking for recommendations or preferences can help you pick an editor to get started with. If you already have your favorite, then you can set it as your default editor with Git.
Any text editor can be made default by adding the correct file path
and command line options (see GitHub
help). However, the simplest core.editor value is
"nano -w" on Mac, Windows, and Linux.
For example:
Lastly, we need to set the name of our default branch to
main.
The init.defaultBranch value configures git to set the
default branch to main instead of master.
Creating a repository
A Git repository is a data structure used to track
changes to a set of project files over time. Repositories are stored
within the same directory as these project files, in a hidden directory
called .git. We can create a new git repository either by
using GitHub’s web interface, or
via the command line. Let’s use the command line to create a git
repository for the experiments that we’re going to do today.
First, we will create a new directory for our project and enter that directory. We will explain commands as we go along.
Using Git
One of the main barriers to getting started with Git is understanding the terminology necessary to executing commands. Although some of the language used in Git aligns with common-use words in English, other terms are not so clear. The best way to learn Git terminology - which consists of a number of verbs such as add, commit and push (preceded by the word ‘git’) - is to use it, which is what we will be doing during this lesson. We will explain these commands as we proceed from setting up a new version-controlled project to publishing our own website.
On a command line interface, Git commands are written as
git verb options, where verb is what we
actually want to do and options is additional optional
information which may be needed for the verb. So let’s get
started with our setup.
We will now create an empty git repository to track changes to our project. To do this we will use the git init command, which is short for initialise.
OUTPUT
Initialized empty Git repository in <your file path>/hello-world/.git/The hello-world directory is now a git repository.
If we run the ls command now (ls lists the
content of the hello-world directory), the repository might
seem empty; however, adding the -a flag for all files via
ls -a will show all hidden files, which in this case
includes the new hidden directory .git. Flags can be
thought of as command line options that can be added to shell
commands.
Note that whenever we use git via the command line, we need to
preface each command (or verb) with git, so that the
computer knows we are trying to get git to do something, rather than
some other program.
Displaying the current project’s status
We can run the git status command to display the current
state of a project. Let’s do that now.
OUTPUT
On branch main
No commits yet
nothing to commit (create/copy files and use "git add" to track)
The output tells us that we are on the main branch (more on this later) and that we have nothing to commit (no unsaved changes).
Two steps: Adding and committing
We will now create and save our first project file. This is a two-step process. First, we add any files for which we want to save the changes to a staging area, then we commit those changes to the repository. This two-stage process gives us fine-grained control over what should and should not be included in a particular commit.
Let’s create a new file using the touch command, which
is a quick way to create an empty file.
The .md extension above signifies that we have chosen to
use the Markdown format, a lightweight markup language with plain text
formatting syntax. We will explore Markdown a bit later.
Let’s check the status of our project again.
OUTPUT
On branch main
No commits yet
Untracked files:
  (use "git add <file>..." to include in what will be committed)

    index.md

nothing added to commit but untracked files present (use "git add" to track)
This status is telling us that git has noticed a new file in our
directory that we are not yet tracking. With colourised output, the
filename will appear in red. To change this, and to tell Git we want to
track any changes we make to index.md, we use git add.
This adds our Markdown file to the staging area (the
area where git checks for file changes). To confirm this we want to use
git status again.
OUTPUT
On branch main

No commits yet

Changes to be committed:
  (use "git rm --cached <file>..." to unstage)

    new file:   index.md
If we are using colourised output, we will see that the filename has changed colour (from red to green). Git also tells us that there is a new file to be committed but, before we do that, let’s add some text to the file.
We will open the file index.md with any text editor we
have at hand (e.g. Notepad on Windows or TextEdit on Mac OSX) and enter
# Hello, world!. The hash character is one way of writing a
header with Markdown. Now, let’s save the file within the text editor
and check if Git has spotted the changes.
OUTPUT
On branch main

No commits yet

Changes to be committed:
  (use "git rm --cached <file>..." to unstage)

	new file:   index.md

Changes not staged for commit:
  (use "git add <file>..." to update what will be committed)
  (use "git checkout -- <file>..." to discard changes in working directory)

	modified:   index.md
This lets us know that git has indeed spotted the changes to our file, but that it hasn’t yet staged them, so let’s add the new version of the file to the staging area.
Now we are ready to commit our first changes. Commit is similar to ‘saving’ a file to Git. However, compared to saving, a commit provides a lot more information about the changes we have made, and this information will remain visible to us later.
OUTPUT
[main (root-commit) e9e8fd3] Add index.md
 1 file changed, 1 insertion(+)
 create mode 100644 index.md
We can see that one file has changed and that we made one insertion,
which was a line with the text ‘#Hello, world!’. We can also see the
commit message ‘Add index.md’, which we added by using the
-m flag after git commit. The commit message
is used to record a short, descriptive, and specific summary of what we
did to help us remember later on without having to look at the actual
changes. If we just run git commit without the
-m option, Git will launch nano (or whatever other editor
we configured as core.editor) so that we can write a longer
message.
Having made a commit, we now have a permanent record of what was changed, and git has also recorded some additional metadata: who made the commit (you!) and when the commit was made (timestamp). You are building a mini-history of your process of working with the files in this directory.
More on the Staging Area
If you think of Git as taking snapshots of changes over the life of a
project, git add specifies what will go in a
snapshot (putting things in the staging area), and
git commit then actually takes the snapshot, and
makes a permanent record of it (as a commit). If you don’t have anything
staged when you type git commit, Git will prompt you to use
git commit -a or git commit --all, which is
kind of like gathering everyone for the picture! However, it’s
almost always better to explicitly add things to the staging area,
because you might commit changes you forgot you made. (Going back to
snapshots, you might get the extra with incomplete makeup walking on the
stage for the snapshot because you used -a!) Try to stage
things manually, or you might find yourself searching for “git undo
commit” more than you would like!

At the moment, our changes are only recorded locally, on our computer. If we wanted to work collaboratively with someone else they would have no way of seeing what we’ve done. We will fix that in the next episode by using GitHub to share our work.
Key Points
- When you initialize a Git repository in a directory, Git starts tracking the changes you make inside that directory.
- This tracking creates a history of the way the files have changed over time.
- Git uses a two-step process to record changes to your files. Changes to files must first be added to the staging area, then committed to the Git repository.
Content from Sharing your work
Last updated on 2023-04-21 | Edit this page
Overview
Questions
- How can I use Git and GitHub to share my work?
- How do I link a local Git repository to GitHub?
- How do I move changes between a local Git repository and a GitHub repository?
- How can I see the differences between my current file and my most recent commit?
Objectives
- create a remote repository on GitHub
- link a local Git repository to a remote GitHub repository
- move changes between the local and remote repositories using
pushandpull - examine the difference between an edited file and the file’s most recently committed version
The power of sharing
The real power of Git lies in being able to share your work with others and in being able to work collaboratively. The best way to do this is to use a remote hosting platform. For this lesson, we are using GitHub. Let’s log in there now.
Create a repository on GitHub
Once we have logged in to GitHub, we can create a new repository by clicking the + icon in the upper-right corner of any page then selecting New repository. Let’s do this now.

- Click “New Repository”
Clicking New Repository will take you to a creation page
with different options. For this workshop, we are not using any of the
options available.
- Name your repository “hello-world.”
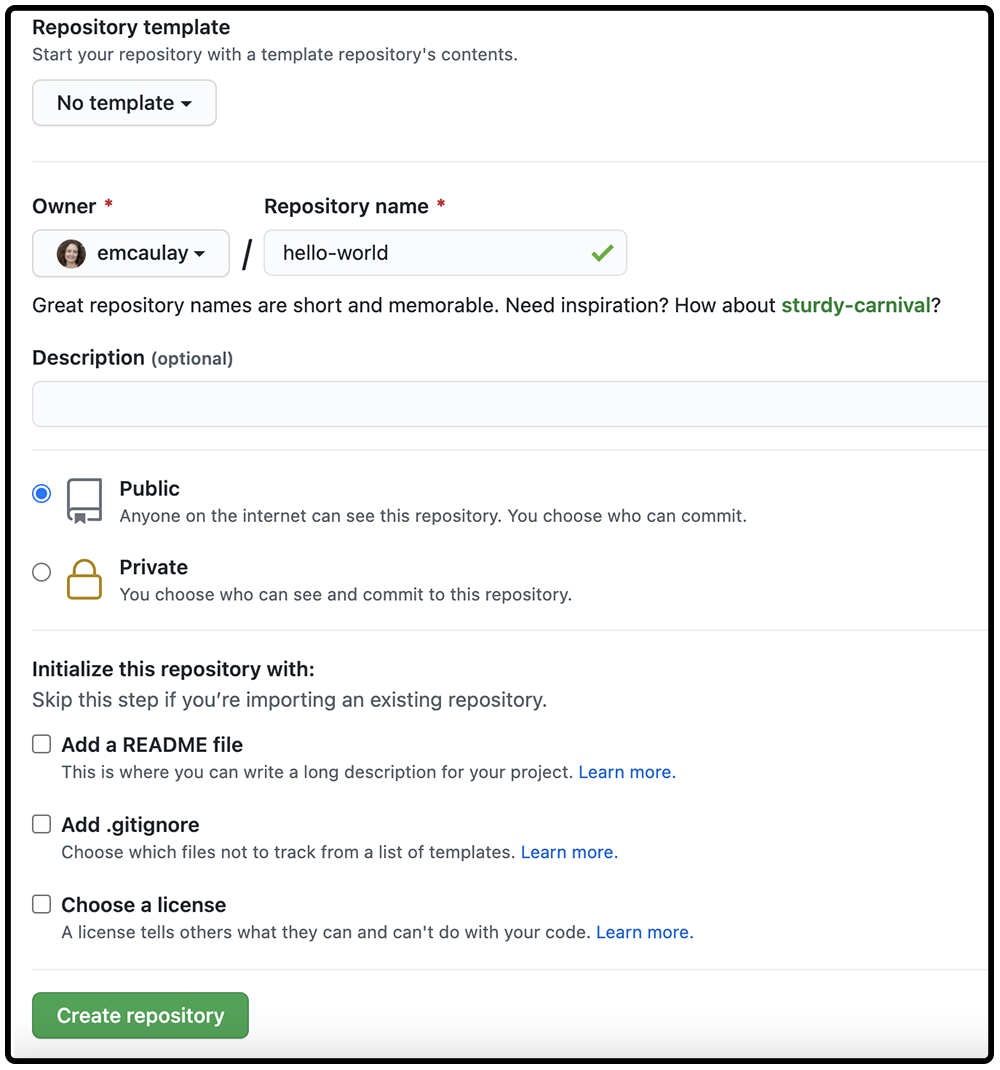
GitHub will ask if you want to add a README.md, license or a
.gitignore file. Do not do any of that for now – We want
you to start with a completely empty repository on GitHub.
- Click
Create Repositorybutton.
Choosing a license
When you are ready to use GitHub to host your own work, you should review the different license options. Choosing a license is an important part of openly sharing your creative and research work online. For help in wading through the many types of open source licenses, please visit https://choosealicense.com/.
Connecting your local repository to the GitHub repository
The next page that GitHub displays contains some information to help
you connect your repository on GitHub with your local repository (on
your own computer). To make this connection, we want to tell our local
repository that GitHub is the remote repository. In order
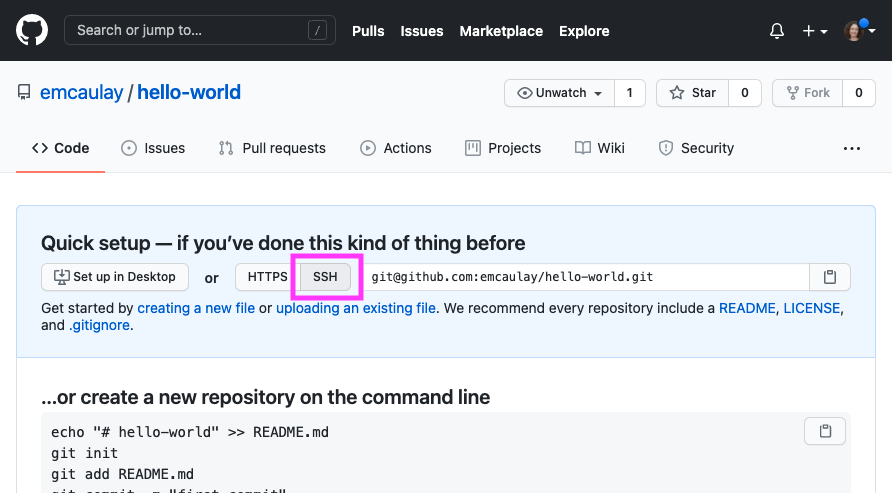
to do that we need the information that GitHub displays in the “Quick
setup” box on this page.
We will use the Secure Shell (SSH) protocol for this lesson, so please make sure that button shows that it is selected (gray highlight) and that the address in the text box starts with git@github. It will look something like this:
HTTPS vs. SSH
We use SSH here because, while it requires some additional configuration, it is a security protocol widely used by many applications. The steps below describe SSH at a minimum level for GitHub.
In the previous episode we created a local repository on our own computer. Now we have also created a remote repository on GitHub. But at this point, the two are completely isolated from each other. We want to link them together to synchronize them and share our project with the world.
To connect the repository on our own computer (local) to the repository we just created on GitHub, we will use the commands provided by GitHub in the box with the heading “…or push an existing repository from the command line.”
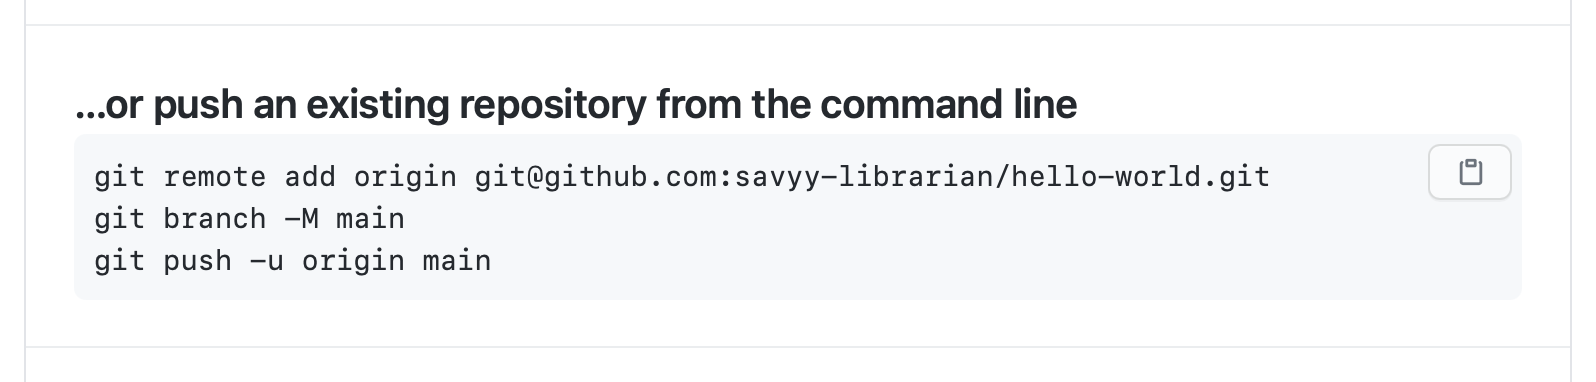
Let’s use these instructions now. Move back to your shell application and enter the first command:
Make sure to use the URL for your actual repository user name rather
than yourname: the only difference should be your username
instead of yourname.
Let’s breakdown the elements of the command. All commands related to
Git in the shell start by invoking the Git language by typing
git at the start. remote add is the command in
the Git language we use to configure a remote repository, e.g., another
Git repository that contains the same content as our local repository,
but that is not on our computer. origin is the nickname
we’re telling our local machine to use to for the following long web
address. After we enter this command, we can use origin to
refer to this specific repository in GitHub instead of the URL.
We can check that it is set up correctly with the command:
OUTPUT
origin  git@github.com:<your_github_username>/hello-world.git (fetch)
origin  git@github.com:<your_github_username>/hello-world.git (push)
SSH Background and Setup
We still need to do a little more setup before we can actually connect to this remote repository. We need to set up a way for our local computer to authenticate with GitHub so that GitHub recognizes our computer as belonging to the same person who owns the GitHub repository.
We will use SSH as our authentication method. SSH stands for Secure SHell protocol. SSH is a cryptographic network protocol that allows secure communication between computers using an otherwise insecure network.
SSH uses what is called a key pair – two keys that work together to validate access. One key is used publicly (the public key) and the other key is kept private (the private key).
You can think of the public key as a padlock, and only you have the key (the private key) to open it. You use the public key where you want a secure method of communication, such as your GitHub account. You give this padlock, or public key, to GitHub and say “lock the communications to my account with this so that only computers that have my private key can unlock communications and send Git commands as my GitHub account.”
What we will do now is the minimum required to set up the SSH keys and add the public key to a GitHub account. I’m not going to lie, this is a bit tedious and confusing. But you have to do it to get to the fun part, so hang in there.
The first thing we are going to do is check if this has already been done on the computer you’re on.
Keeping your keys secure
You shouldn’t really forget about your SSH keys, since they keep your account secure. It’s good practice to audit your secure shell keys every so often. Especially if you are using multiple computers to access your account.
We will run the list command (ls) to check what key
pairs already exist on your computer. In our command we use the
~ as the shorthand for “my home directory.”
Your output is going to look a little different depending on whether or not SSH has ever been set up on the computer you are using.
If you have not set up SSH, your output might look like this:
OUTPUT
ls: cannot access '/c/Users/YourName/.ssh': No such file or directoryIf SSH has been set up on the computer you’re using, the public and
private key pairs will be listed. The file names are either
id_ed25519/id_ed25519.pub or
id_rsa/id_rsa.pub depending on how the key
pairs were set up.
If you do not have SSH set up, let’s set it up now. Use this command to create key pairs:
OUTPUT
Generating public/private ed25519 key pair.
Enter file in which to save the key (/c/Users/YourName/.ssh/id_ed25519):
We want to use the default file, so just press Enter.
OUTPUT
Created directory '/c/Users/YourName/.ssh'.
Enter passphrase (empty for no passphrase):
Your computer is now asking you for a passphrase to protect this SSH key pair. We recommend that you use a passphrase and that you make a note of it. There is no “reset my password” option for this setup. If you forget your passphrase, you have to delete your existing key pair and do this setup again. It’s not a big deal, but easier if you don’t have to repeat it.
OUTPUT
Enter same passphrase again:After entering the same passphrase a second time, you will receive the confirmation
OUTPUT
Your identification has been saved in /c/Users/YourName/.ssh/id_ed25519
Your public key has been saved in /c/Users/YourName/.ssh/id_ed25519.pub
The key fingerprint is:
SHA256:SMSPIStNyA00KPxuYu94KpZgRAYjgt9g4BA4kFy3g1o yourname@domain.name
The key's randomart image is:
+--[ED25519 256]--+
|^B== o.          |
|%*=.*.+          |
|+=.E =.+         |
| .=.+.o..        |
|....  . S        |
|.+ o             |
|+ =              |
|.o.o             |
|oo+.             |
+----[SHA256]-----+
The “identification” is actually the private key. You should never share it. The public key is appropriately named. The “key fingerprint” is a shorter version of a public key.
Now that we have generated the SSH keys, we will find the SSH files when we check.
OUTPUT
drwxr-xr-x 1 YourName 197121   0 Jul 16 14:48 ./
drwxr-xr-x 1 YourName 197121   0 Jul 16 14:48 ../
-rw-r--r-- 1 YourName 197121 419 Jul 16 14:48 id_ed25519
-rw-r--r-- 1 YourName 197121 106 Jul 16 14:48 id_ed25519.pub
Now we need to give our public key (the padlock) over to GitHub.
First, we need to copy the public key. Be sure to include the
.pub at the end, otherwise you’re looking at the private
key.
OUTPUT
ssh-ed25519 AAAAC3NzaC1lZDI1NTE5AAAAIDmRA3d51X0uu9wXek559gfn6UFNF69yZjChyBIU2qKI yourname@domain.nameCopy that entire line of output, and we will paste the copied text into GitHub in the next step.
Now, going to GitHub.com, click on your profile icon in the top right corner to get the drop-down menu. Click “Settings,” then on the settings page, click “SSH and GPG keys,” on the left side “Account settings” menu. Click the “New SSH key” button on the right side. Now, you can add the title (A person might use the title “My 2021 work laptop,” just a little description to remind themselves which computer this public key connect to). Paste your SSH key into the field, and click the “Add SSH key” to complete the setup.
Now that we’ve set that up, let’s check our authentication from the command line.
OUTPUT
Hi YourName! You've successfully authenticated, but GitHub does not provide shell access.Pushing changes
Now we have established a connection between the two repositories,
but we still haven’t synchronized their content, so the remote
repository is still empty. To fix that, we will have to “push” our local
changes to the GitHub repository. We do this using the
git push command:
OUTPUT
Counting objects: 3, done.
Writing objects: 100% (3/3), 226 bytes | 0 bytes/s, done.
Total 3 (delta 0), reused 0 (delta 0)
To https://github.com/<your_github_username/hello-world
 * [new branch]      main -> main
Branch main set up to track remote branch main from origin.
The nickname of our remote repository is “origin” and the default
local branch name is “main”. The -u flag tells git to
remember the parameters, so that next time we can simply run
git push and Git will know what to do.
Pushing our local changes to the Github repository is sometimes
referred to as “pushing changes upstream to Github”. The
word upstream here comes from the git flag we used earlier
in the command git push -u origin main. The flag
-u refers to -set-upstream, so when we say
pushing changes upstream, it refers to the remote repository.
You may be prompted to enter your GitHub username and password to complete the command.
When we do a git push, we will see Git ‘pushing’ changes
upstream to GitHub. Because our file is very small, this won’t take long
but if we had made a lot of changes or were adding a very large
repository, we might have to wait a little longer. We can check where
we’re at with git status.
OUTPUT
On branch main
Your branch is up-to-date with 'origin/main'.
nothing to commit, working tree clean
This output lets us know where we are working (the main branch). We can also see that we have no changes to commit and everything is in order.
We can use the git diff command to see changes we have
made before making a commit. Open index.md with any text editor and
enter some text on a new line, for instance “A new line” or something
else. We will then use git diff to see the changes we
made:
OUTPUT
diff --git a/index.md b/index.md
index aed0629..989787e 100644
--- a/index.md
+++ b/index.md
@@ -1 +1,2 @@
-# Hello, world!
\ No newline at end of file
+# Hello, world!
+A new line
The command produces lots of information and it can be a bit overwhelming at first, but let’s go through some key information here:
- The first line tells us that Git is producing output similar to the
Unix
diffcommand, comparing the old and new versions of the file. - The second line tells exactly which versions of the file Git is
comparing;
aed0629and989787eare unique computer-generated identifiers for those versions. - The third and fourth lines once again show the name of the file being changed.
- The remaining lines are the most interesting; they show us the actual differences and the lines on which they occur. In particular, the + markers in the first column show where we have added lines.
We can now commit these changes:
If we are very forgetful and have already forgotten what we changed,
git log allows us to look at what we have been doing with
our git repository (in reverse chronological order, with the very latest
changes first).
OUTPUT
commit 8e2eb9920eaa0bf18a4adfa12474ad58b765fd06
Author: Your Name <your_email>
Date:   Mon Jun 5 12:41:45 2017 +0100

    Add another line

commit e9e8fd3f12b64fc3cbe8533e321ef2cdb1f4ed39
Author: Your Name <your_email>
Date:   Fri Jun 2 18:15:43 2017 +0100

    Add index.md
This shows us the two commits we have made and shows the messages we wrote. It is important to try to use meaningful commit messages when we make changes. This is especially important when we are working with other people who might not be able to guess as easily what our short cryptic messages might mean. Note that it is best practice to always write commit messages in the imperative (e.g. ‘Add index.md’, rather than ‘Adding index.md’).
Pushing changes (again)
Now, let’s have a look at the repository at GitHub again (that is,
https://github.com/some-librarian/hello-world with
some-librarian replaced with your username). We see that
the index.md file is there, but there is only one
commit:

And if you click on index.md you will see that it
contains the “Hello, world!” header, but not the new line we just
added.
This is because we haven’t yet pushed our local changes to the remote repository. This might seem like a mistake in design but it is often useful to make a lot of commits for small changes so you are able to make careful revisions later and you don’t necessarily want to push all these changes one by one.
Another benefit of this design is that you can make commits without being connected to internet.
But let’s push our changes now, using the git push
command:
OUTPUT
Counting objects: 3, done.
Writing objects: 100% (3/3), 272 bytes | 0 bytes/s, done.
Total 3 (delta 0), reused 0 (delta 0)
To https://github.com/<your_github_username>/hello-world
   e9e8fd3..8e2eb99  main -> main
And let’s check on GitHub that we now have 2 commits there.
Pulling changes
When working with others, or when we’re making our own changes from different machines, we need a way of pulling those remote changes back into our local copy. For now, we can see how this works by making a change on the GitHub website and then ‘pulling’ that change back to our computer.
Let’s go to our repository in GitHub and make a change. Underneath where our index.md file is listed you will see a button to ‘Add a README’. Do this now, entering whatever you like, scrolling to the bottom and clicking ‘Commit new file’ (The default commit message will be ‘Create README.md’, which is fine for our purposes).
The README file
It is good practice to add a README file to each project to give a brief overview of what the project is about. If you put your README file in your repository’s root directory, GitHub will recognize and automatically surface your README to repository visitors
Our local repository is now out of sync with our remote repository,
so let’s fix that by pulling the remote changes into our local
repository using the git pull command.
OUTPUT
remote: Counting objects: 3, done.
remote: Compressing objects: 100% (2/2), done.
remote: Total 3 (delta 0), reused 0 (delta 0), pack-reused 0
Unpacking objects: 100% (3/3), done.
From https://github.com/<your_github_username>/hello-world
   8e2eb99..0f5a7b0  main     -> origin/main
Updating 8e2eb99..0f5a7b0
Fast-forward
 README.md | 1 +
 1 file changed, 1 insertion(+)
 create mode 100644 README.md
The above output shows that we have fast-forwarded our local
repository to include the file README.md. We could confirm this by
entering the ls command.
When we begin collaborating on more complex projects, we may have to consider more aspects of git functionality, but this should be a good start. In the next section, we can look more closely at collaborating and using GitHub pages to create a website for our project.
Key Points
- remote repositories on GitHub help you collaborate and share your work
-
pushis a Git verb for sending changes from the local repository to a remote repository -
pullis a Git verb for bringing changes from a remote repository to the local repository -
diffis a Git verb for viewing the difference between an edited file and the file’s most recent commit
Content from Review
Last updated on 2023-04-21 | Edit this page
Overview
Questions
- How can I cement my understanding of Git’s functions?
Objectives
- rephrase Git commands using everyday language
- demonstrate Git’s functions by drawing or sketching
Let’s review
It is likely that some things won’t have stuck from the last hour. To try to reinforce how things work we can work in groups to develop diagrams to illustrate Git functions and language. This should make carrying out more complicated aspects of Git clearer in our heads.
In groups:
- illustrate the concepts discussed in the first hour
- try to ‘draw’ what different commands mean
- try to come up with synonyms for what the commands are doing.
Exercise - visualising git
In group work, spend some time trying to illustrate some of the commands we’ve used with Git:
- try to express git commands in a non ‘git’ way
- try to visualise what commits are doing to your repository
If you want to practise more feel free to keep practicising making changes to your file and committing the changes. If you want to explore more git commands, search for some more online or follow one of the suggested links below.
Key Points
- the language of Git can be confusing and intimidating
- rephrasing commands and drawing concepts can clarify Git’s workflow
Content from GitHub Pages
Last updated on 2023-04-21 | Edit this page
Overview
Questions
- What is GitHub Pages?
- How can I use GitHub Pages to collaborate and share my work?
Objectives
- create a GitHub Pages branch and push a file to it
- with a partner, experiment with collaborating on a GitHub Pages website
- apply the workflow between local and remote repositories to collaborate on a website
GitHub Pages
GitHub Pages is a simple service to publish a website directly on GitHub from a Git repository. You add some files and folders to a repository and GitHub Pages turns it into a website. You can use HTML directly if you like, but they also provide Jekyll, which renders Markdown into HTML and makes it really easy to setup a blog or a template-based website.
Why GitHub Pages is awesome!
GitHub Pages allows you to version control your website. This is useful for a lot of different reasons. It allows you to keep a record of what changes you have made. It allows people to reference your website at a particular point in time and (if you make your source open) to see what it was like at that particular point in time. This is very useful for academic citations. Most people have had the experience of following up a reference to a website and either getting a 404 error or seeing something completely different. Although using versions on your site doesn’t guarantee this won’t happen, it does make it easier to manage old versions of your site.
GitHub Pages also mean that you can collaborate on a website with a lot of people without everyone having to communicate endlessly back and forwards about what changes need to be made, or have been made already. You can create ‘issues’ (things that need discussing or fixing), list things to do in the future, and allow other people visiting your website to quickly suggest, and help implement changes through pull requests.
Enable GitHub Pages
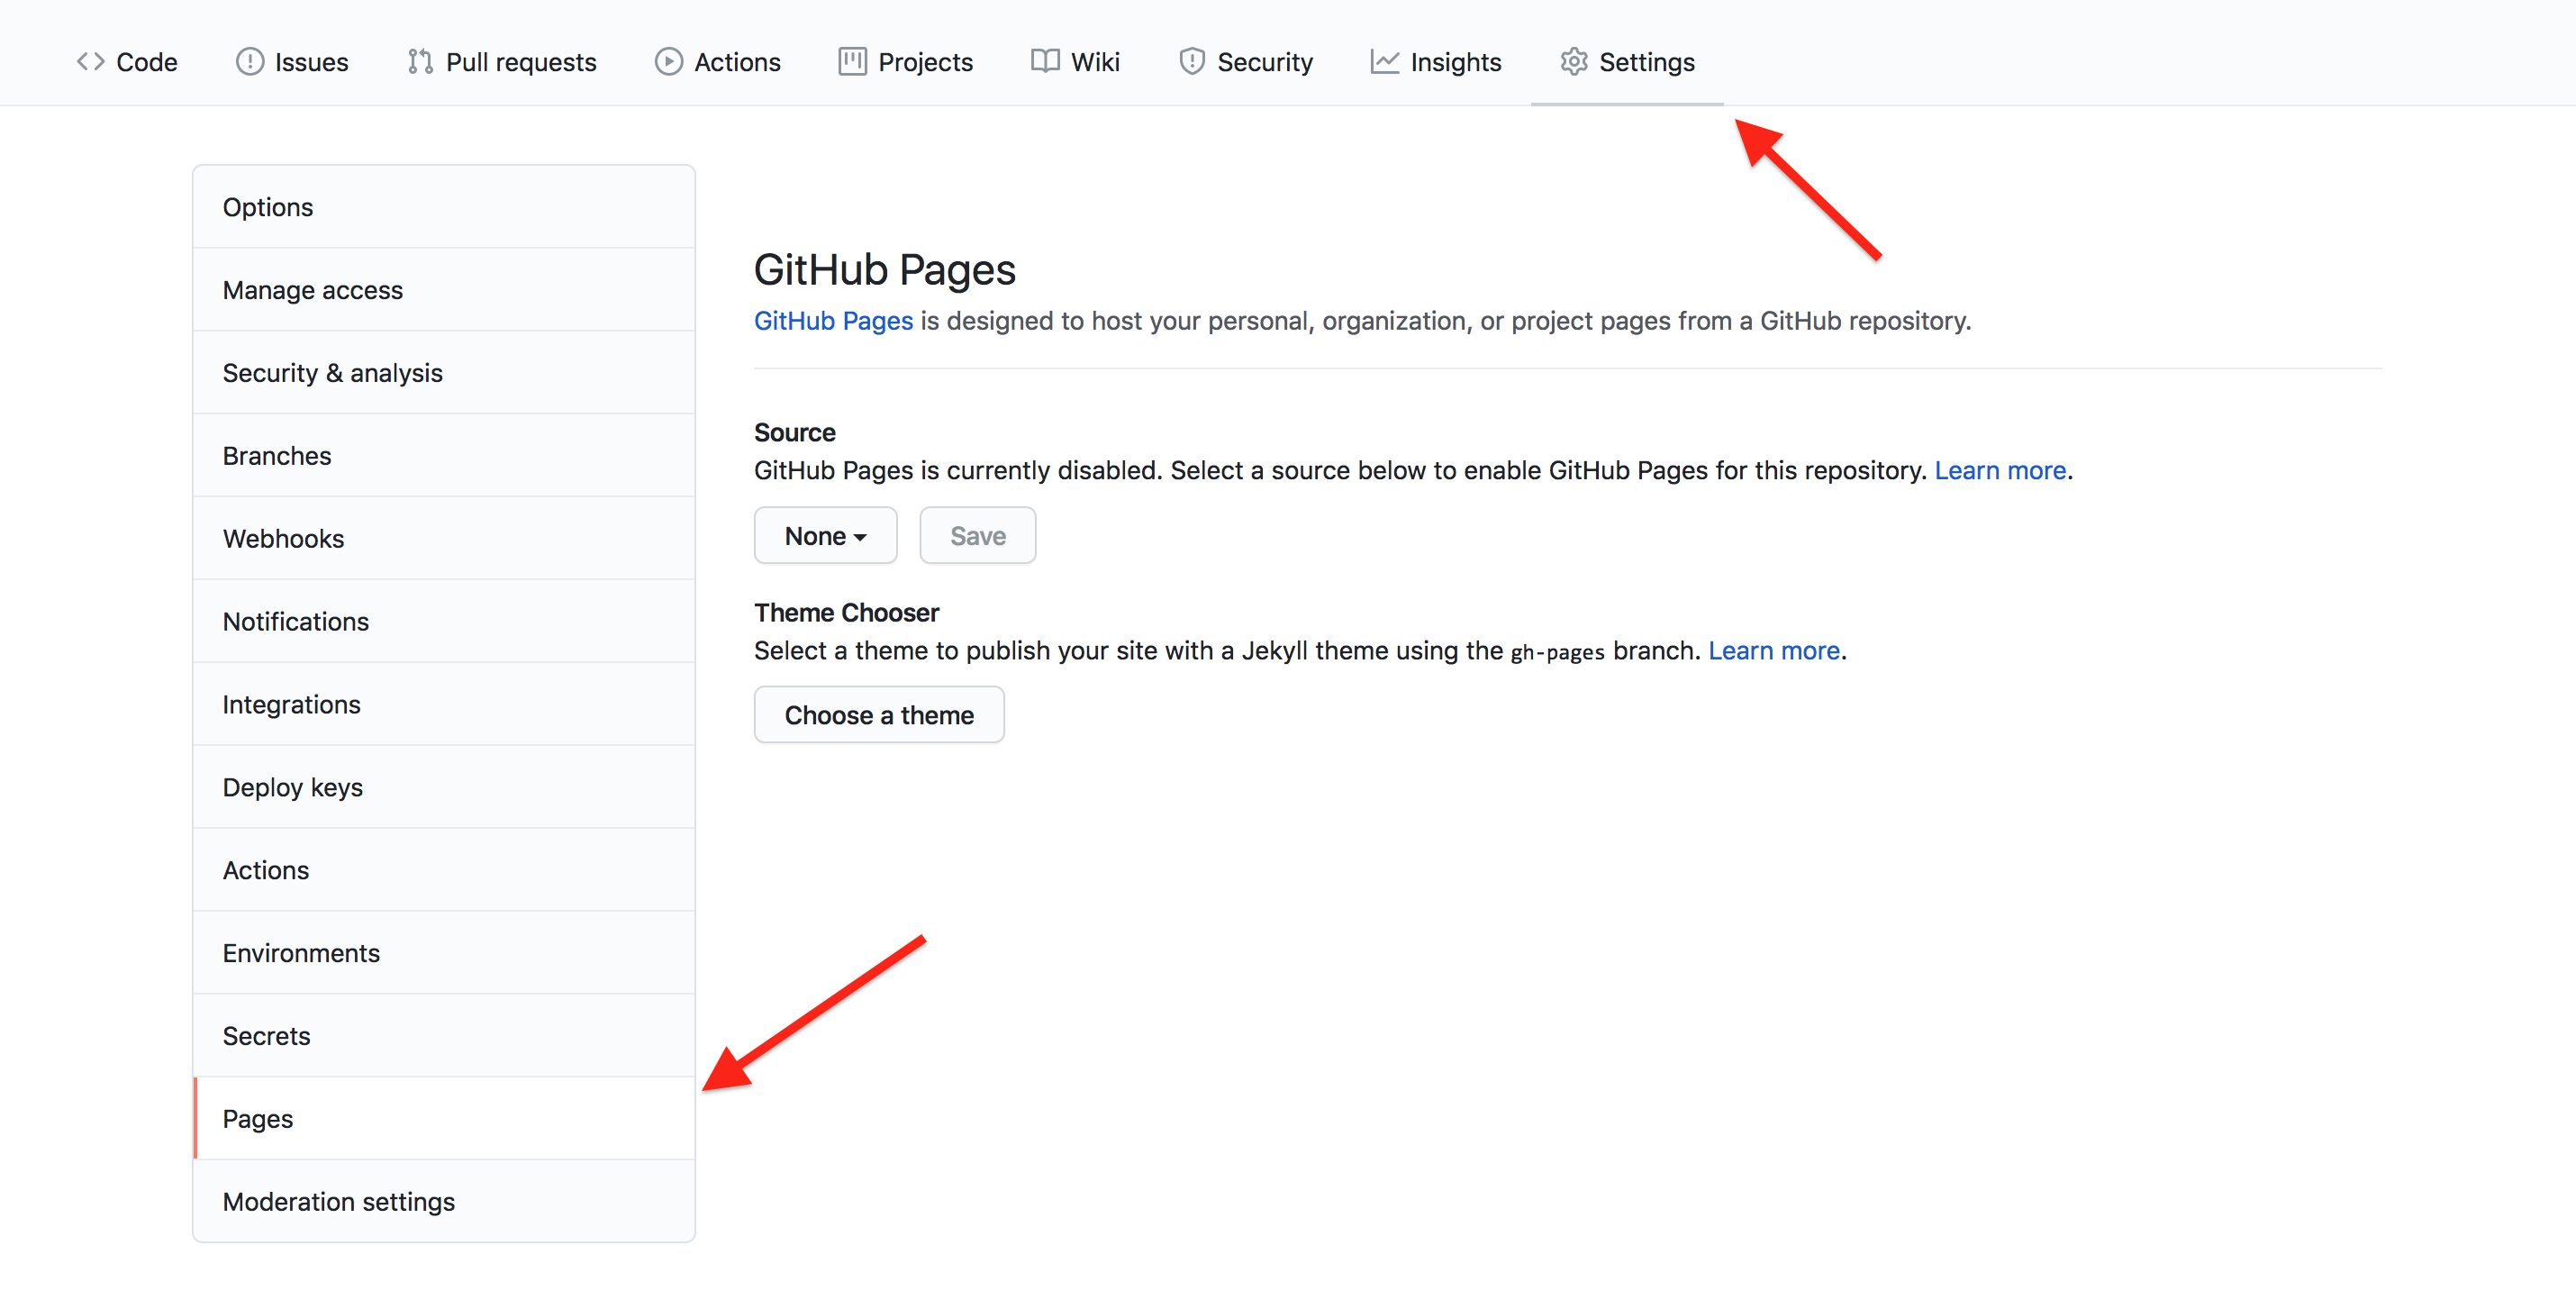
GitHub Pages is turned off by default for all new repositories, and can be turned on in the settings menu for any repository.
Let’s set up a new site by enabling GitHub Pages for our project.
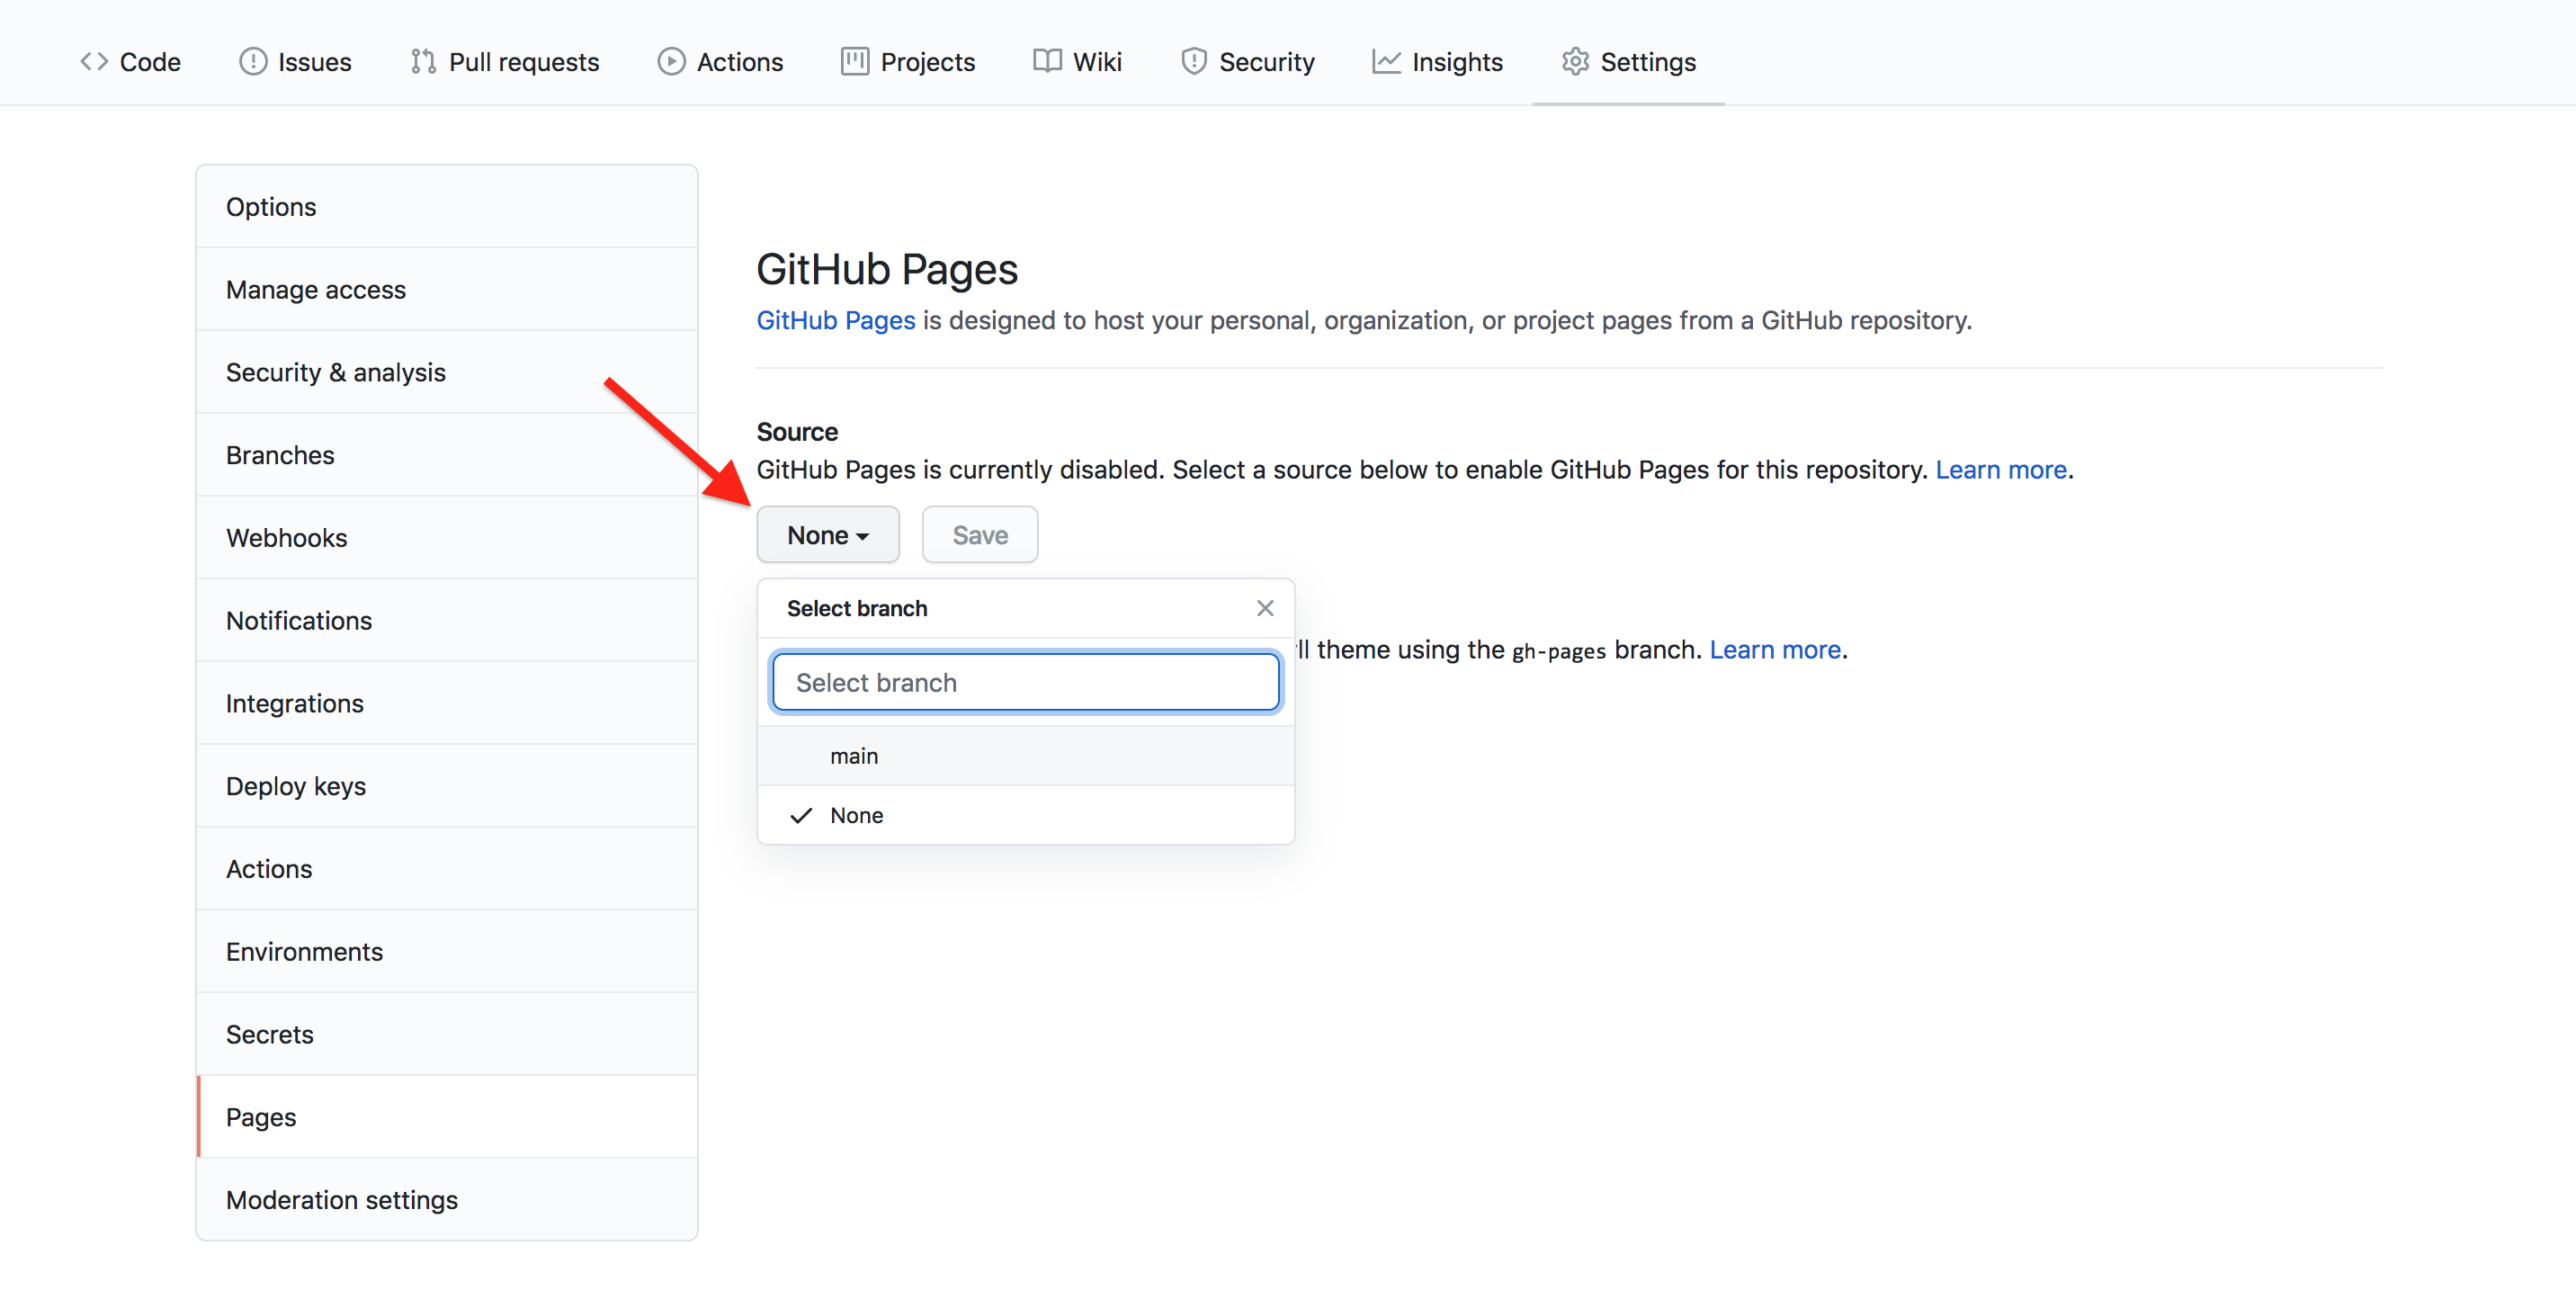
Go to the Pages section of your repository’s Settings:
Source branch (required)
Pages needs to know the branch in your repository from which you want
to serve your site. This can be any branch, including
main.
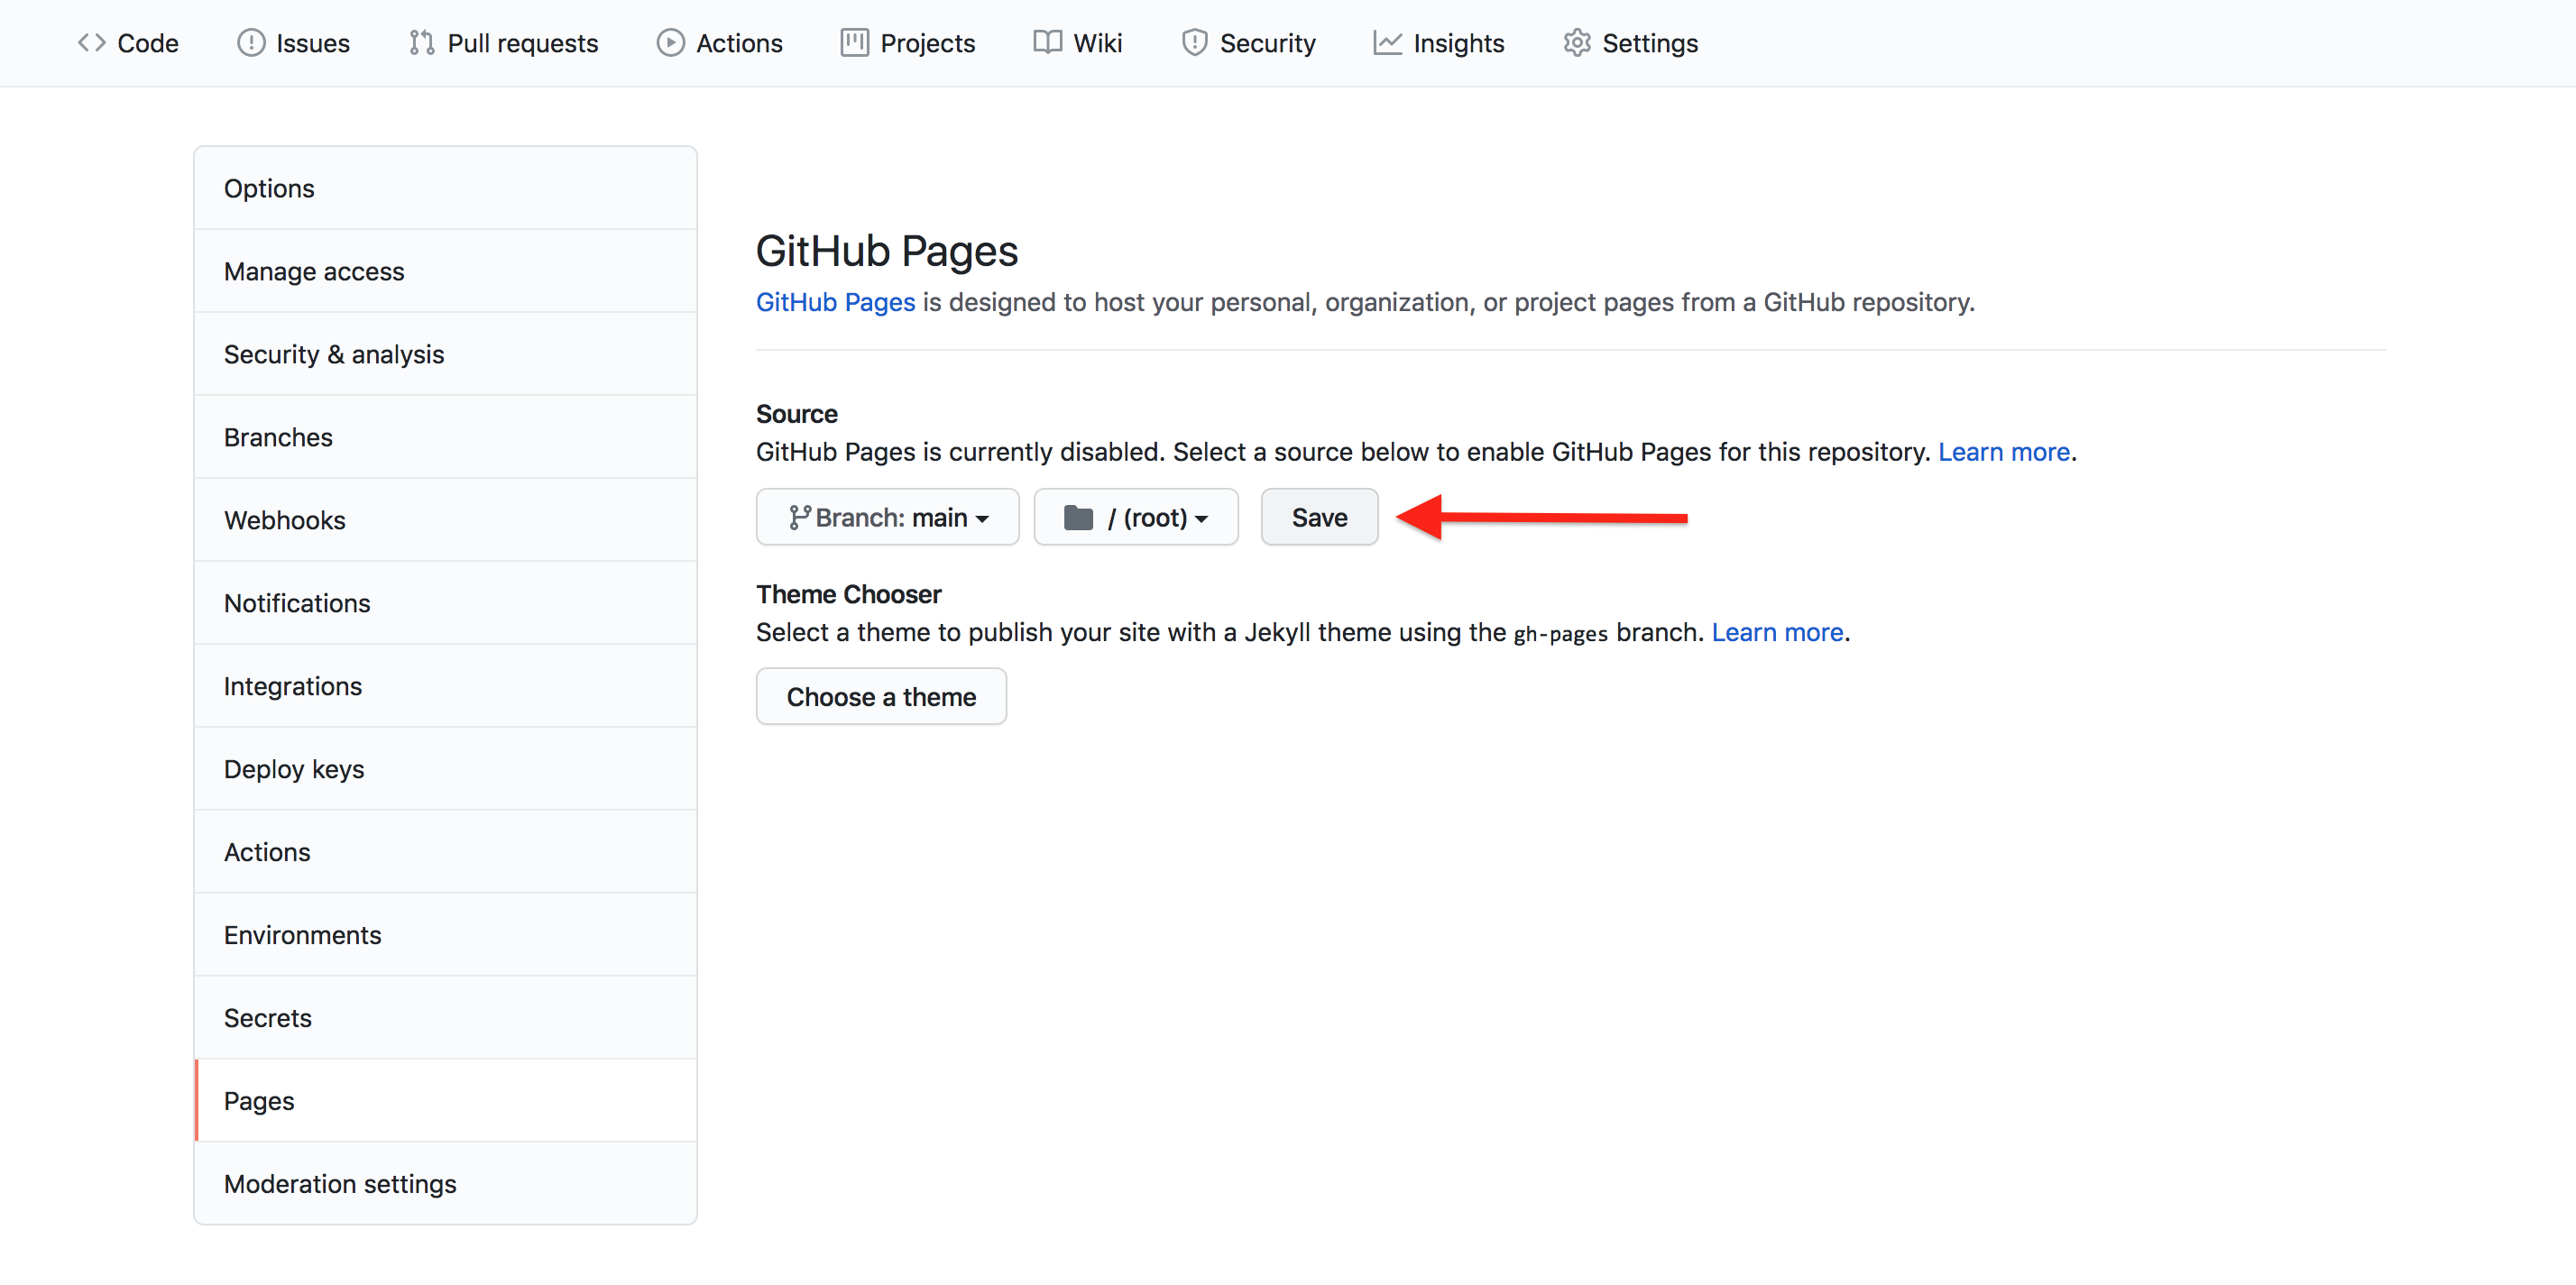
Select then save the source branch:
Theme (optional)
GitHub Pages provides different themes to visually style and organize your site’s content. Choosing a theme is optional, and themes can be interchanged quickly.
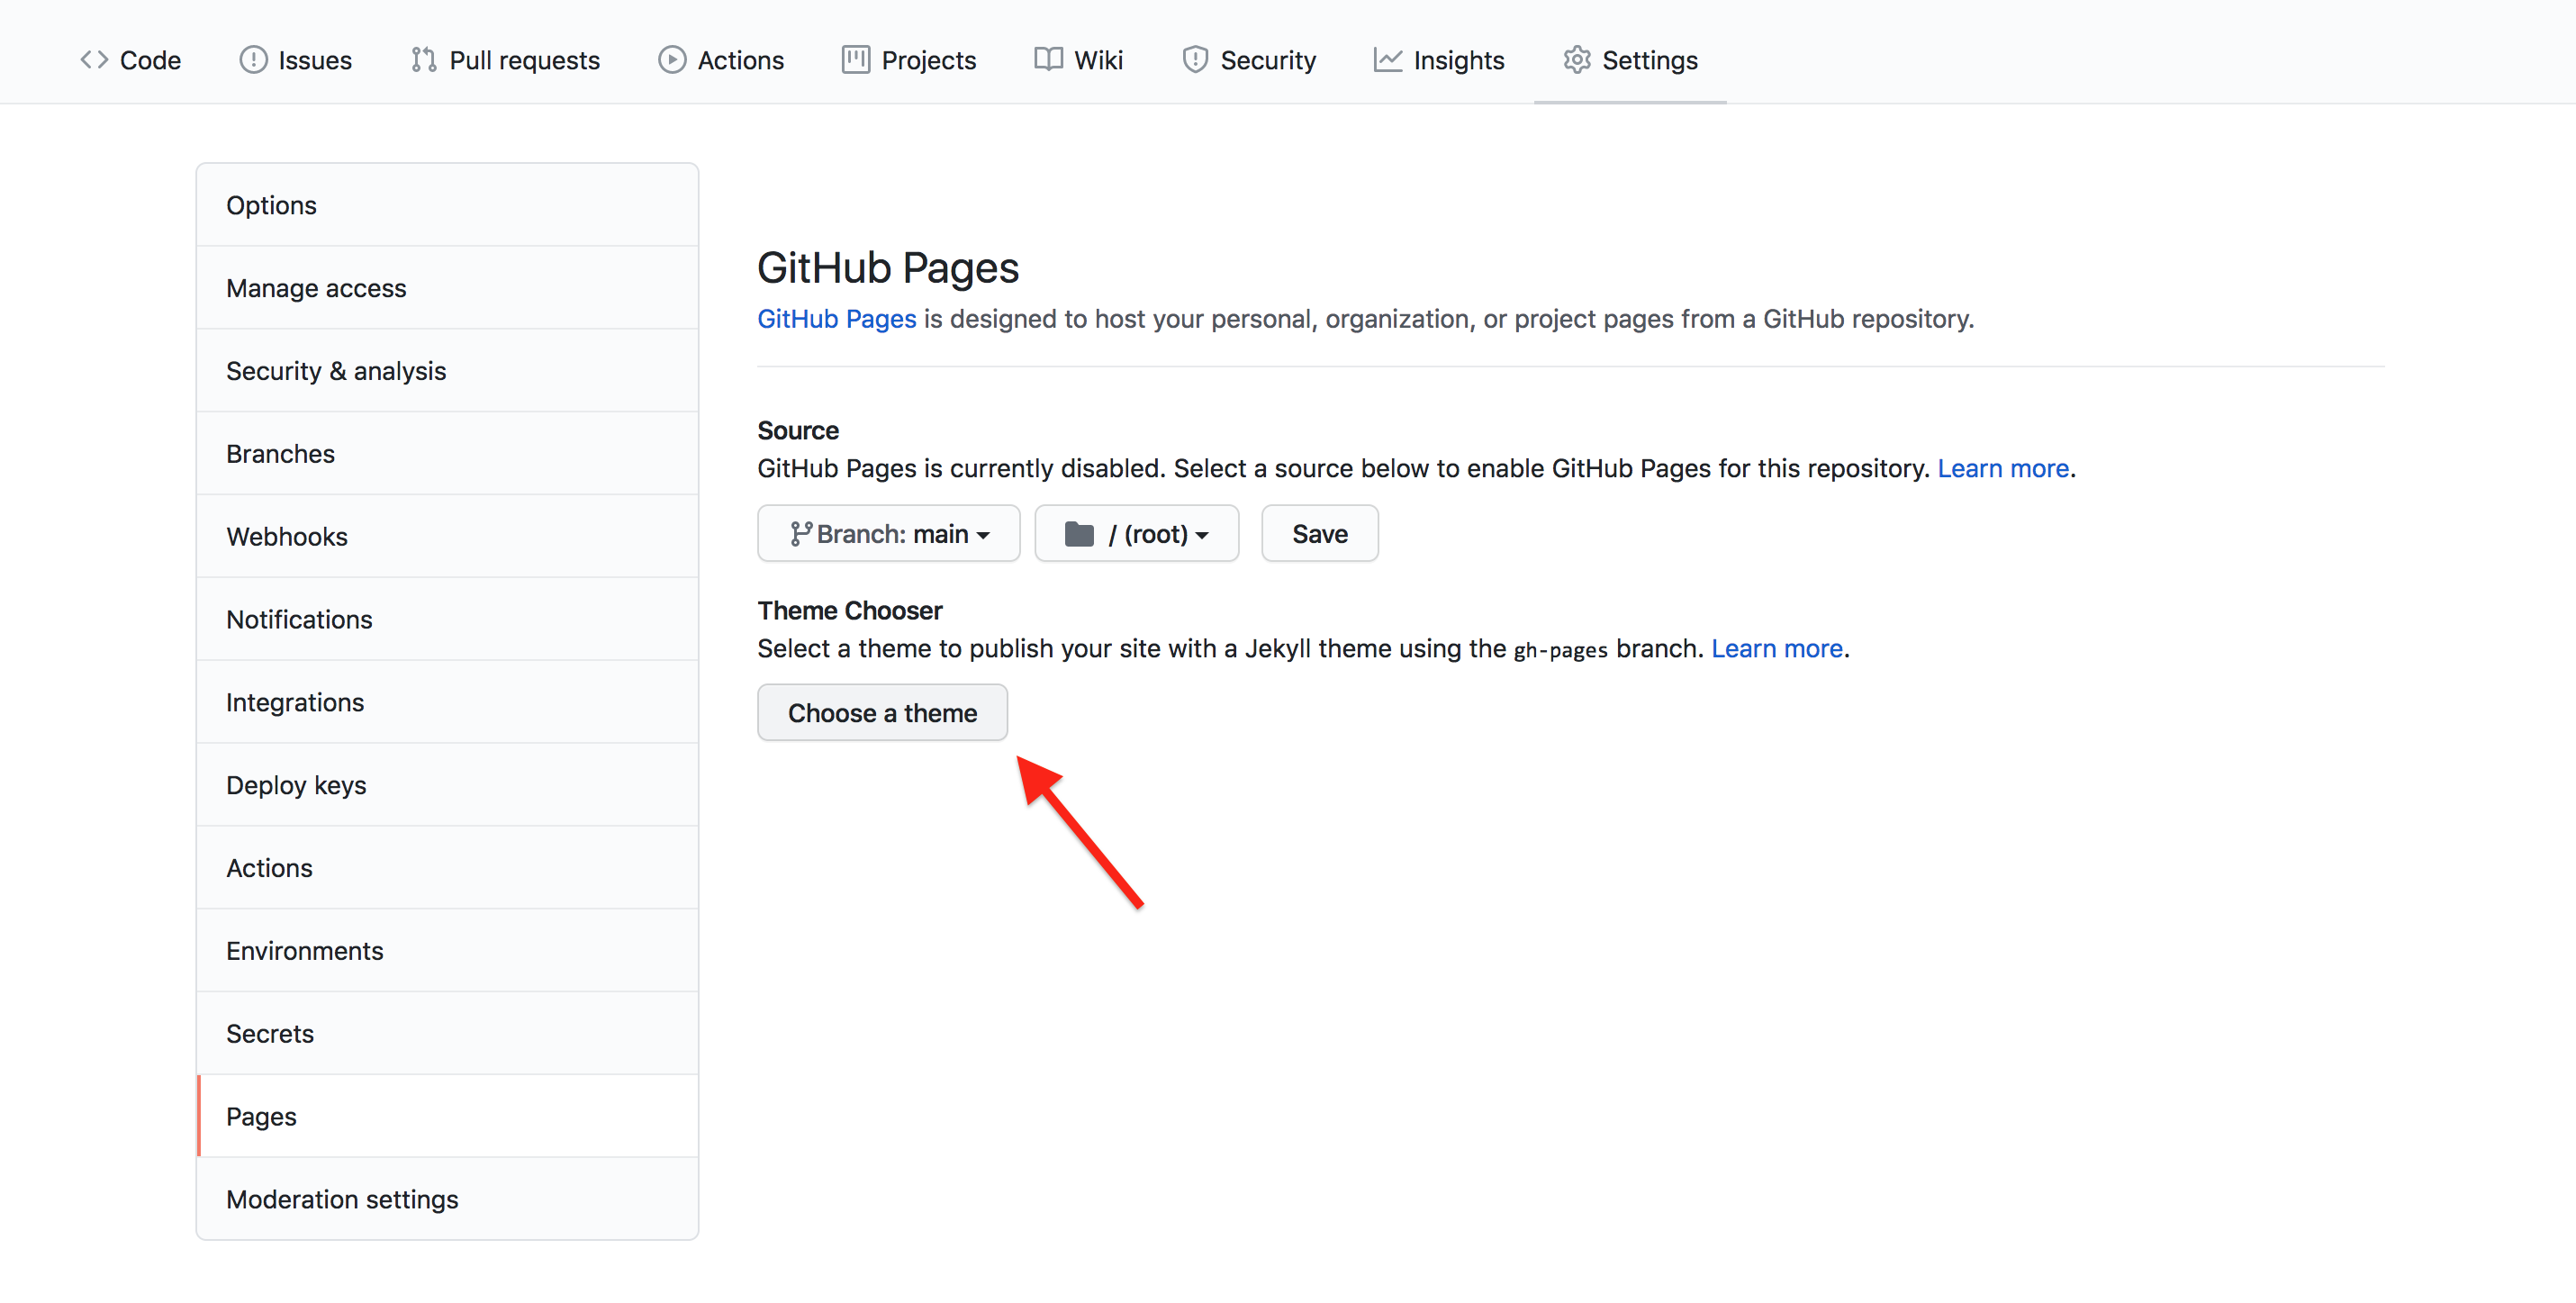
See the GitHub Pages documentation for further information on using themes.
View your site
If we now visit
https://some-librarian.github.io/hello-world/, we should
see the contents of the index.md file that created earlier. Usually it’s
available instantly, but it can take a few seconds and in the worst case
a few minutes if GitHub are very busy.
Challenge: Contributing to a page owned by someone else (slightly easier way)
To practice using Git, GitHub pages and Markdown we can contribute to a GitHub pages site. Pair up in groups of two (or more if needed) and do the exercises below together.
Go to https://github.com/some-librarian/hello-world, where “some-librarian” is the username of your exercise partner.
Click on “Fork” in the upper right part of the screen to create a copy of the repository on your account. Once you have a fork > of your partner’s repository, you can edit the files in your own fork directly.
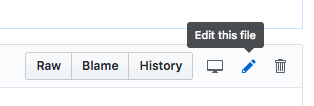
Click the “index.md” file, then click the edit pencil icon:
Now is good chance to try some Markdown syntax. Try some of the examples at Mastering Markdown. You can preview how it will look before you commit changes.
Once you are ready to commit, enter a short commit message, select “Create a new branch for this commit and start a pull request” and press “Propose file change” to avoid commiting directly to the main branch.
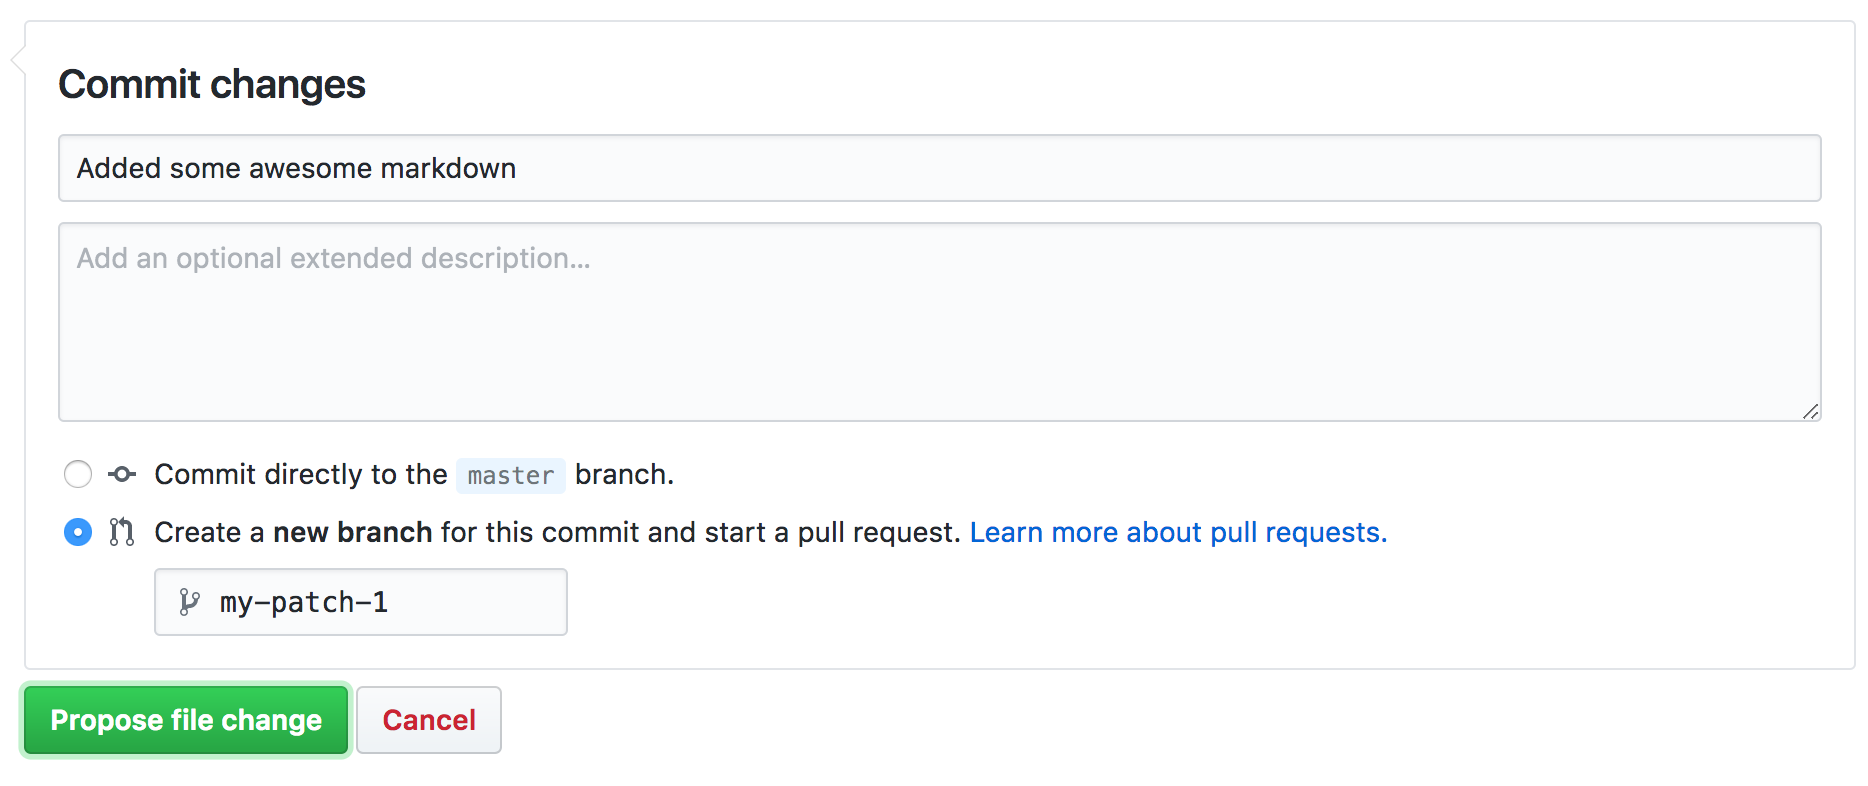
You can now go to the repository on your account and click “New Pull Request” button, where you can select base branches repositories, review the changes and add an additional explanation before sending the pull request (this is especially useful if you make a single pull request for multiple commits).
Your partner should now see a pull request under the “Pull requests” tab and can accept (“Merge pull request”) the changes there. Try this.
This whole process of making a fork and a pull request might seem a bit cumbersome. Try to think of why it was needed? And why it’s called “pull request”?
We made a fork and a pull request because we did not have permission to edit (or commit) the repository directly. A fork is a copy of the repository that we can edit. By making a pull request we ask the owner of the repository if they would like to accept (pull in) the changes from our fork (our copy) into their version. The owner can then review the changes and choose to accept or reject them.
You can open pull requests on any repository you find on GitHub. If you are a group of people who plan to collaborate closely, on the other hand, it’s more practical to grant everyone access to commit directly instead.
Optional challenge: Contributing to a page owned by someone else (slightly more complicated way)
Instead of making edits on the GitHub website you can ‘clone’ the fork to your local machine and work there.
Challenge
Try following the rest of the steps in this guide under “Time to Submit Your First PR”.
(If you followed step 1 and 2 in the previous challenge, you already have a fork and you can skip the creation of a new fork. Start instead at the section titled “Cloning a fork.” You can submit multiple pull requests using the same fork.)
Optional challenge: Adding an HTML page
GitHub Pages is not limited to Markdown. If you know some HTML, try adding an HTML page to your repository. You could do this on the command line or directly on GitHub. The steps below are for working directly on GitHub:
- To add a new file directly on GitHub, press the “Create new file” button.
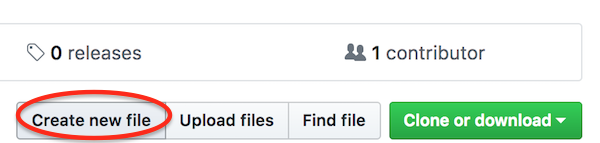
Name it ‘test.html’, add some HTML and click “Commit new file”.
Try opening
https://some-librarian.github.io/hello-world/test(replace “some-librarian” with your username). Notice that the HTML extension is not included.
Key Points
- GitHub Pages offer an automated way to create a website that is version controlled and accessible for collaboration
- Collaborating on a GitHub Pages website uses the same Git/GitHub workflow you learned for collaborating via a GitHub repository