Manipulating MARC data advanced
Last updated on 2024-09-05 | Edit this page
Estimated time: 43 minutes
Overview
Questions
- How can the Edit Shortcuts features be used to manipulate data?
- How can Build New Field be used to combine elements from existing MARC fields into a new field?
- How can the RDA Helper be used?
- How can Select Records for Edit be used to manipulate a subset of your MARC file?
Objectives
- Explain Edit Shortcuts, Build New Field, RDA Helper, and Select Records for Edit advanced functions
Edit Shortcuts
The Edit Shortcuts menu can be found by going to Edit in the menu in the MarcEditor and then selecting Edit Shortcuts. Edit Shortcuts have several powerful options.
- Change Case: You can select to change the case of a MARC field or a MARC field and subfield to lower, upper, initial, or title case. You can also capitalize the initial character.
- Field Edits: You can clean smart characters or ISBD punctuation, correct mnemonic errors, generate paired ISBN-13 values, find fields missing a word, find records missing a field, find records with duplicate tags, insert a Generic LDR if it is missing, limit the number of fields, replace HTML entities, or swap a title.
- Math Functions: Convert to decimal degrees.
Let’s use Edit Shortcuts to make the 099$a upper case
- Go to Edit → Edit Shortcuts
- In the new window, in the field box, type in
099$a - Click OK
Use Find or Find All to Verify Results
You can use Find or Find All to verify that the change did what you expected on your records in the file. If a result didn’t work as expected, you can select “Special Undo”. This is why it is important to profile your data before doing batch edits.
Building a MARC field
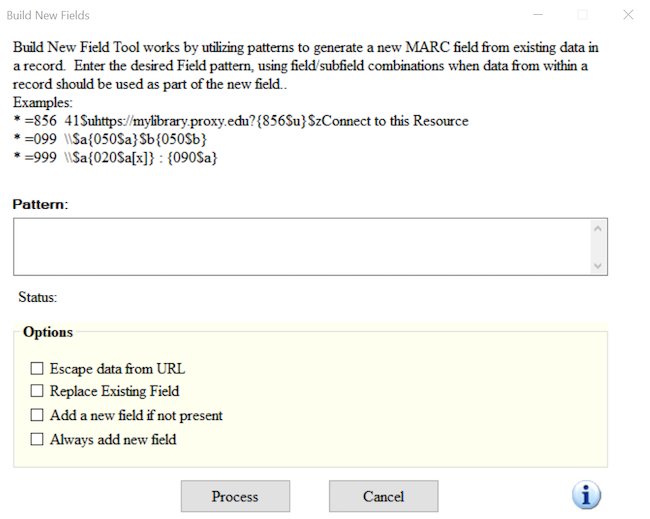
Sometimes it is necessary to create a new MARC field based on the content of existing MARC fields. This is possible using the function called, Build New Field.
Let’s build a new 035 9\$a using
the data from the 001 and static data
- Go to Tools → Build New Field
- In the new window, in the field box, type in
=035 9\$a(LCMarcEdit){001} - Select the box to “Always add this field”
- Click Process
Use the Build New Field to add a proxy to the
856$u
- For eResources, it is sometimes necessary to add your institution’s
proxy information to the url in the
856$u. Addhttps://exampleproxy.edu/login?url=prefix to the url in the856$u.
- Go to Tools → Build New Field
- In the new window, in the field box, type in
=856 40\$uhttps://exampleproxy.edu/login?url={856$u} - Select the box to “Replace Existing Field”
- Click Process
Beware the Build New Field Function
In the example above, if your 856 contains other subfields such as
$3, then these will not be retained because you are only building a new
856 that replaces the current one. To retain $3 data, you would need to
include this parameter in your function. This would look like
=856 40{856$3}\$uhttps://exampleproxy.edu/login?url={856$u}
Also note, the build new field works on the first iteration of the field. When working in particular with the MARC field 856, if you need to build a new field using all of the MARC fields 856 in your record, you can use the syntax [x] as in {856$u[x]}. This will ensure all of the MARC fields in the records will undergo the build operation you specify.
Advanced Subfield Edit Functions
There are 3 advanced Edit Subfield features that are extremely useful. These are append, prepend, and change subfield. These aren’t regular expressions but special characters built into the MarcEditor Edit Subfield tool.
- Prepend data to a subfield: Special character ^b
- Change subfield character: Special character ^c
- Append data to a subfield: Special character ^e
Let’s add the proxy to the 856$u using the prepend special character ^b
- Go to Tools → Edit Subfield Data
- In Field, Enter 856
- In Subfield, Enter u
- In Field Data, Enter ^b
- In Replace with, Enter “https://exampleproxy.edu/login?url=”
- Click Replace
RDA Helper
Records aren’t created equal in that we encounter MARC data that follows different descriptive cataloging standards. There are many records cataloged according to the AACR2 standard or even AACR or earlier. Sometimes it is necessary to make sure these records follow the current RDA descriptive cataloging standard. MarcEdit lets you do this through the function called RDA Helper.
To run the RDA Helper, go to Tools and select RDA Helper. In the
window that opens, you can pick and choose how you would like to
transform your records to align better with the RDA descriptive
standard. For example, you can add the RDA fields 336, 337, and 338 for
content, media, and carrier types. You can update the MARC field 040 to
include the $e rda and delete the GMD statement. You can
also evaluate the 260/264.

Run the RDA Helper on your MARC data
- Run the RDA Helper with these settings: Add 336, 337, 338; Modify the 040; Evaluate the 260/264; Always use the copyright symbol; Expand abbreviations; Remove the GMD.
- Go to Tools in the upper menu in the MarcEditor
- Select RDA Helper
- Check off the settings listed above
- Click the OK button.
- Check your MARC data. Do you see the changes?
Select Records to Edit
There are times when you need to work on a subset of your MARC data. The Select Records for Edit function allows you do this.
Before using the Select Records for Edit function, save your file (Ctrl + S) to capture recent edits.
Go to File and click on Select Records for Edit. In the window, you
will see Display Field in the lower right hand corner. This is where you
enter the MARC field you want to see displayed once you import your
file. You can enter a MARC field and subfield or just a MARC field. The
MARC field and/or subfield that you add in this box will provide the
criteria you need to select records you want to edit. Once you have
entered the Display Field, click on Import File. This will import the
MARC (.mrk) file that you are currently working on. You can
select another MARC (.mrk) file in the box Source MARC
file.
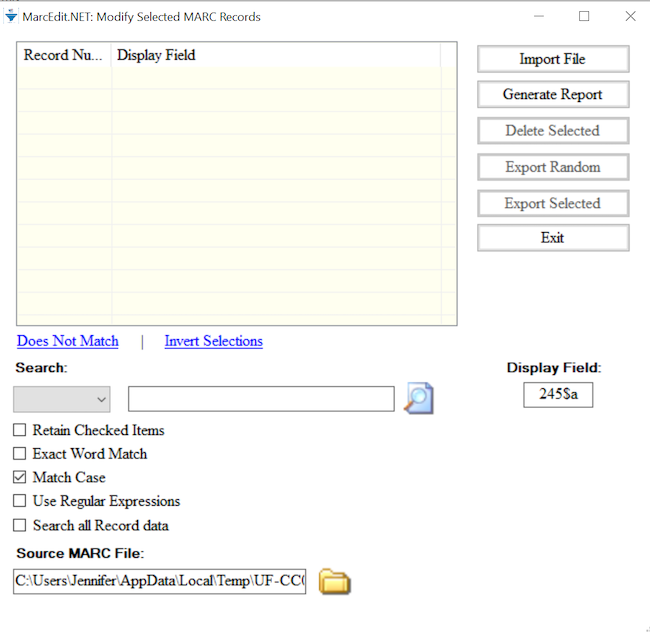
Records can be selected individually by clicking the checkbox. However, to select only the records you want to edit in bulk, enter your criteria in the Search box and click the magnifying glass icon. Records in your file where the contents of the selected Display Field match your search criteria will be selected. Click on Export Selected to export these records and edit them.
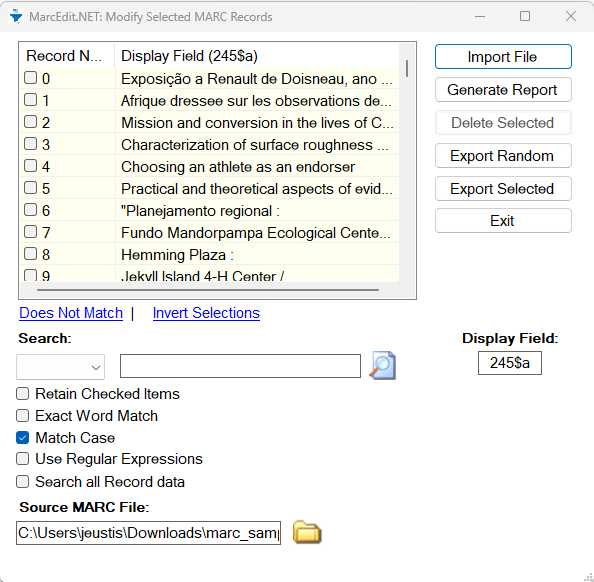
When saving the exported records you can choose to save the file as a new record subset (Save As), or merge the edits back into your complete record set (Save). When selecting (Save) to merge edits back into your complete record set, the temporary record set will close. Reopen your complete record set .mrk file to continue editing.
Let’s add cutters to call numbers in the 099
- Go to File → Select Records to Edit
- In the new window, type in
099$bin the Field Display - Click on Import File
- In the search box, type in “Display field not found” to locate all
records missing
099$b - Click the magnifying glass icon. A pop up window will indicate the number of records selected that match your criteria. Click OK.
- Click on Export Selected. A pop up window indicate that your selected records have been extracted. Click OK.
- A new MarcEditor window will open. Note the temporary file name at the top of the editor window indicating this file is distinct from your main file. In the new MarcEditor, go to Tools → Call Number tools → Cuttering Tools → Generate Cutters.
- In the field box enter 099, select Cutter order (1xx,2xx), and click Process
- Check your results by using Find All
=099 - Select File → Save. A pop up window will indicate your extracted data with edits has been saved back into your main file. Click OK.
For more information on the Cuttering Tool, watch Terry Reese’s YouTube video Automatically Generating Cutter for Call Numbers
Key Points
- Advanced reports and functions are available in MarcEdit to apply global and selective edits
- MarcEdit comes with an array of tools to manipulate data and validate MARC.