Content from What is the shell?
Last updated on 2023-05-08 | Edit this page
Overview
Questions
- What is the shell?
- What is the command line?
- Why should I use it?
Objectives
- Describe the basics of the Unix shell
- Explain why and how to use the command line
Introduction: What is the shell, and why should I use it?
If you’ve ever had to deal with large amounts of data or large numbers of digital files scattered across your computer or a remote server, you know that copying, moving, renaming, counting, searching through, or otherwise processing those files manually can be immensely time-consuming and error-prone. Fortunately, there is an extraordinarily powerful and flexible tool designed for just that purpose.
The shell (sometimes referred to as the “Unix shell”, for the operating system where it was first developed) is a program that allows you to interact with your computer using typed text commands. It is the primary interface used on Linux and Unix-based systems, such as macOS, and can be installed optionally on other operating systems such as Windows.
It is the definitive example of a “command line interface”, where instructions are given to the computer by typing in commands, and the computer responds by performing a task or generating an output. This output is often directed to the screen, but can be directed to a file, or even to other commands, creating powerful chains of actions with very little effort.
Using a shell sometimes feels more like programming than like using a mouse. Commands are terse (often only a couple of characters long), their names are frequently cryptic, and their output is lines of text rather than something visual like a graph. On the other hand, with only a few keystrokes, the shell allows you to combine existing tools into powerful pipelines and to handle large volumes of data automatically. This automation not only makes you more productive, but also improves the reproducibility of your workflows by allowing you to save and then repeat them with a few simple commands. Understanding the basics of the shell provides a useful foundation for learning to program, since some of the concepts you will learn here—such as loops, values, and variables—will translate to programming.
The shell is one of the most productive programming environments ever created. Once mastered, you can use it to experiment with different commands interactively, then use what you have learned to automate your work.
In this session we will introduce task automation by looking at how data can be manipulated, counted, and mined using the shell. The session will cover a small number of basic commands, which will constitute building blocks upon which more complex commands can be constructed to fit your data or project. Even if you do not do your own programming or your work currently does not involve the command line, knowing some basics about the shell can be useful.
Note to Lesson Instructor: Consider providing an example here of how you’ve used the Unix shell to solve a problem in the last week or month
Where is my shell?
The shell is a program that is usually launched on your computer much in the way you would start any other program. However, there are numerous kinds of shells with different names, and they may or may not be already installed. The shell is central to Linux-based computers, and macOS machines ship with Terminal, a shell program. For Windows users, popular shells such as Cygwin or Git Bash provide a Unix-like interface, but may need to be installed separately. In Windows 10, the Windows Subsystem for Linux also gives access to a Bash shell command-line tool.
For this lesson, we will use Git Bash for Windows users, Terminal for macOS, and the shell for Linux users.
Content from Working with files and directories
Last updated on 2024-02-23 | Edit this page
Overview
Questions
- How can I copy, move, and delete files and directories?
- How can I read files?
Objectives
- Work with files and directories from the command line
- Use tab completion to limit typing
- Use commands to print and view files and parts of files
- Use commands to move/rename, copy, and delete files
Working with files and folders
As well as navigating directories, we can interact with files on the command line: we can read them, open them, run them, and even edit them. In fact, there’s really no limit to what we can do in the shell, but even experienced shell users still switch to graphical user interfaces (GUIs) for many tasks, such as editing formatted text documents (Word or OpenOffice), browsing the web, editing images, etc. But if we wanted to make the same crop on hundreds of images, say, the pages of a scanned book, then we could automate that cropping work by using shell commands.
Before getting started, we will use ls to list the
contents of our current directory. Using ls periodically to
view your options is useful to orient oneself.
OUTPUT
Applications Documents    Library      Music        Public
Desktop      Downloads    Movies       Pictures
We will try a few basic ways to interact with files. Let’s first move
into the shell-lesson directory on your desktop.
OUTPUT
/Users/riley/Desktop/shell-lessonHere, we will create a new directory and move into it:
Here we used the mkdir command (meaning ‘make
directories’) to create a directory named ‘firstdir’. Then we moved into
that directory using the cd command.
But wait! There’s a trick to make things a bit quicker. Let’s go up one directory.
Instead of typing cd firstdir, let’s try to type
cd f and then press the Tab key. We notice that the shell
completes the line to cd firstdir/.
Tab for Auto-complete
Pressing tab at any time within the shell will prompt it to attempt to auto-complete the line based on the files or sub-directories in the current directory. Where two or more files have the same characters, the auto-complete will only fill up to the first point of difference, after which we can add more characters, and try using tab again. We would encourage using this method throughout today to see how it behaves (as it saves loads of time and effort!).
Reading files
If you are in firstdir, use cd .. to get
back to the shell-lesson directory.
Here there are copies of two public domain books downloaded from Project Gutenberg along with other files we will cover later.
OUTPUT
total 33M
-rw-rw-r-- 1 riley staff 383K Feb 22 2017  201403160_01_text.json
-rw-r--r-- 1 riley staff 3.6M Jan 31 2017  2014-01-31_JA-africa.tsv
-rw-r--r-- 1 riley staff 7.4M Jan 31 2017  2014-01-31_JA-america.tsv
-rw-rw-r-- 1 riley staff 125M Jun 10 2015  2014-01_JA.tsv
-rw-r--r-- 1 riley staff 1.4M Jan 31 2017  2014-02-02_JA-britain.tsv
-rw-r--r-- 1 riley staff 582K Feb  2 2017  33504-0.txt
-rw-r--r-- 1 riley staff 598K Jan 31 2017  829-0.txt
-rw-rw-r-- 1 riley staff  18K Feb 22 2017  diary.html
drwxr-xr-x 1 riley staff  64B Feb 22 2017  firstdir
The files 829-0.txt and 33504-0.txt holds
the content of book #829 and #33504 on Project Gutenberg. But we’ve
forgot which books, so we try the cat command to
read the text of the first file:
The terminal window erupts and the whole book cascades by (it is printed to your terminal), leaving us with a new prompt and the last few lines of the book above this prompt.
Often we just want a quick glimpse of the first or the last part of a
file to get an idea about what the file is about. To let us do that, the
Unix shell provides us with the commands head and
tail.
OUTPUT
The Project Gutenberg eBook, Gulliver's Travels, by Jonathan Swift


This eBook is for the use of anyone anywhere at no cost and with
almost no restrictions whatsoever.  You may copy it, give it away or
re-use it under the terms of the Project Gutenberg License included
with this eBook or online at www.gutenberg.org
This provides a view of the first ten lines, whereas
tail 829-0.txt provides a perspective on the last ten
lines:
OUTPUT
Most people start at our Web site which has the main PG search facility:

    http://www.gutenberg.org

This Web site includes information about Project Gutenberg-tm,
including how to make donations to the Project Gutenberg Literary
Archive Foundation, how to help produce our new eBooks, and how to
subscribe to our email newsletter to hear about new eBooks.
If ten lines is not enough (or too much), we would check
man head (or head --help when using Windows)
to see if there exists an option to specify the number of lines to get
(there is: head -n 20 will print 20 lines).
Another way to navigate files is to view the contents one screen at a
time. Type less 829-0.txt to see the first screen,
spacebar to see the next screen and so on, then
q to quit (return to the command prompt).
Like many other shell commands, the commands cat,
head, tail and less can take any
number of arguments (they can work with any number of files). We will
see how we can get the first lines of several files at once. To save
some typing, we introduce a very useful trick first.
Re-using commands
On a blank command prompt, press the up arrow key and notice that the previous command you typed appears before your cursor. We can continue pressing the up arrow to cycle through your previous commands. The down arrow cycles back toward your most recent command. This is another important labour-saving function and something we’ll use a lot.
Press the up arrow until you get to the head 829-0.txt
command. Add a space and then 33504-0.txt (Remember your
friend Tab? Type 3 followed by tab to get
33504-0.txt), to produce the following command:
OUTPUT
==> 829-0.txt <==
The Project Gutenberg eBook, Gulliver's Travels, by Jonathan Swift


This eBook is for the use of anyone anywhere at no cost and with
almost no restrictions whatsoever.  You may copy it, give it away or
re-use it under the terms of the Project Gutenberg License included
with this eBook or online at www.gutenberg.org


==> 33504-0.txt <==
The Project Gutenberg EBook of Opticks, by Isaac Newton

This eBook is for the use of anyone anywhere at no cost and with
almost no restrictions whatsoever.  You may copy it, give it away or
re-use it under the terms of the Project Gutenberg License included
with this eBook or online at www.gutenberg.org


Title: Opticks
       or, a Treatise of the Reflections, Refractions, Inflections,
All good so far, but if we had lots of books, it would be
tedious to enter all the filenames. Luckily the shell supports
wildcards! The ? (matches exactly one character) and
* (matches zero or more characters) are probably familiar
from library search systems. We can use the * wildcard to
write the above head command in a more compact way:
More on wildcards
Wildcards are a feature of the shell and will therefore work with
any command. The shell will expand wildcards to a list of files
and/or directories before the command is executed, and the command will
never see the wildcards. As an exception, if a wildcard expression does
not match any file, Bash will pass the expression as a parameter to the
command as it is. For example typing ls *.pdf results in an
error message that there is no file called *.pdf.
Moving, copying and deleting files
We may also want to change the file name to something more
descriptive. We can move it to a new name by using the
mv or move command, giving it the old name as the first
argument and the new name as the second argument:
This is equivalent to the ‘rename file’ function.
Afterwards, when we perform a ls command, we will see
that it is now called gulliver.txt:
OUTPUT
2014-01-31_JA-africa.tsv   2014-02-02_JA-britain.tsv  gulliver.txt
2014-01-31_JA-america.tsv  33504-0.txt
2014-01_JA.tsv
Copying a file
Instead of moving a file, you might want to copy a
file (make a duplicate), for instance to make a backup before modifying
a file. Just like the mv command, the cp
command takes two arguments: the old name and the new name. How would
you make a copy of the file gulliver.txt called
gulliver-backup.txt? Try it!
The wildcards and regular expressions
The ? wildcard matches one character. The *
wildcard matches zero or more characters. If you attended the lesson on
regular expressions, do you remember how you would express that as
regular expressions?
(Regular expressions are not a feature of the shell, but some commands support them. We’ll get back to that.)
- The
?wildcard matches the regular expression.(a dot) - The
*wildcard matches the regular expression.*
Using history
Use the history command to see a list of all the
commands you’ve entered during the current session. You can also use
Ctrl + r to do a reverse lookup. Press
Ctrl + r, then start typing any part of the
command you’re looking for. The past command will autocomplete. Press
enter to run the command again, or press the arrow keys to
start editing the command. If multiple past commands contain the text
you input, you can Ctrl + r repeatedly to cycle
through them. If you can’t find what you’re looking for in the reverse
lookup, use Ctrl + c to return to the prompt. If
you want to save your history, maybe to extract some commands from which
to build a script later on, you can do that with
history > history.txt. This will output all history to a
text file called history.txt that you can later edit. To
recall a command from history, enter history. Note the
command number, e.g. 2045. Recall the command by entering
!2045. This will execute the command.
Using the echo command
The echo command simply prints out a text you specify.
Try it out: echo 'Library Carpentry is awesome!'.
Interesting, isn’t it?
You can also specify a variable. First type NAME=
followed by your name, and press enter. Then type
echo "$NAME is a fantastic library carpentry student" and
press enter. What happens?
You can combine both text and normal shell commands using
echo, for example the pwd command you have
learned earlier today. You do this by enclosing a shell command in
$( and ), for instance $(pwd).
Now, try out the following:
echo "Finally, it is nice and sunny on" $(date). Note that
the output of the date command is printed together with the
text you specified. You can try the same with some of the other commands
you have learned so far.
Why do you think the echo command is actually quite important in the shell environment?
You may think there is not much value in such a basic command like
echo. However, from the moment you start writing automated
shell scripts, it becomes very useful. For instance, you often need to
output text to the screen, such as the current status of a script.
Moreover, you just used a shell variable for the first time, which can be used to temporarily store information, that you can reuse later on. It will give many opportunities from the moment you start writing automated scripts.
Finally, onto deleting. We won’t use it now, but if you do want to
delete a file, for whatever reason, the command is rm, or
remove.
Using wildcards, we can even delete lots of files. And adding the
-r flag we can delete folders with all their content.
Unlike deleting from within our graphical user interface,
there is no warning, no recycling bin from which you
can get the files back and no other undo options! For that
reason, please be very careful with rm and extremely
careful with rm -r.
Content from Automating the tedious with loops
Last updated on 2024-02-23 | Edit this page
Overview
Questions
- What is a loop?
- How can a loop be used to repeat a task?
Objectives
- Describe how loops can be used to repeat tasks
- Implement a loop to rename several files
Writing a Loop
Loops are key to productivity improvements through
automation as they allow us to execute commands repetitively. Similar to
wildcards and tab completion, using loops also reduces the amount of
typing (and typing mistakes). Suppose we have several hundred document
files named project_1825.txt,
project_1863.txt, XML_project.txt and so on.
We would like to change these files, but also save a version of the
original files, naming the copies backup_project_1825.txt
and so on.
We can use a loop to do that. Here’s a simple example that creates a backup copy of four text files in turn.
Let’s first create those files:
$ touch a.txt b.txt c.txt d.txtThis will create four empty files with those names.
Now we will use a loop to create a backup version of those files. First let’s look at the general form of a loop:
BASH
for thing in list_of_things
do
    operation_using $thing    # Indentation within the loop is not required, but aids legibility
done
We can apply this to our example like this:
OUTPUT
a.txt
b.txt
c.txt
d.txt
When the shell sees the keyword for, it knows to repeat
a command (or group of commands) once for each thing in a
list. For each iteration, the name of each thing is sequentially
assigned to the loop variable and the commands inside
the loop are executed before moving on to the next thing in the list.
Inside the loop, we call for the variable’s value by putting
$ in front of it. The $ tells the shell
interpreter to treat the variable as a variable name
and substitute its value in its place, rather than treat it as text or
an external command.
Double-quoting variable substitutions
Because real-world filenames often contain white-spaces, we wrap
$filename in double quotes ("). If we didn’t,
the shell would treat the white-space within a filename as a separator
between two different filenames, which usually results in errors.
Therefore, it’s best and generally safer to use "$..."
unless you are absolutely sure that no elements with white-space can
ever enter your loop variable (such as in episode 5).
In this example, the list is four filenames: ‘a.txt’, ‘b.txt’,
‘c.txt’, and ‘d.txt’. Each time the loop iterates, it will assign a file
name to the variable filename and run the cp
command. The first time through the loop, $filename is
a.txt. The interpreter prints the filename to the screen
and then runs the command cp on a.txt,
(because we asked it to echo each filename as it works its way through
the loop). For the second iteration, $filename becomes
b.txt. This time, the shell prints the filename
b.txt to the screen, then runs cp on
b.txt. The loop performs the same operations for
c.txt and then for d.txt and then, since the
list only included these four items, the shell exits the
for loop at that point.
Same Symbols, Different Meanings
Here we see > being used as a shell prompt, but
> can also be used to redirect output from a command
(i.e. send it somewhere else, such as to a file, instead of displaying
the output in the terminal) — we’ll use redirection in episode 5. Similarly, $
is used as a shell prompt, but, as we saw earlier, it is also used to
ask the shell to get the value of a variable.
If the shell prints > or $ then
it expects you to type something, and the symbol is a prompt.
If you type > in the shell, it is an
instruction from you to the shell to redirect output.
If you type $ in the shell, it is an
instruction from you to the shell to get the value of a variable.
We have called the variable in this loop filename in
order to make its purpose clearer to human readers. The shell itself
doesn’t care what the variable is called.
This is our first look at loops. We will run another loop in the Counting and Mining with the Shell episode.

Running the loop from a Bash script
Alternatively, rather than running the loop above on the command
line, you can save it in a script file and run it from the command line
without having to rewrite the loop again. This is what is called a Bash
script which is a plain text file that contains a series of commands
like the loop you created above. In the example script below, the first
line of the file contains what is called a Shebang (#!)
followed by the path to the interpreter (or program) that will run the
rest of the lines in the file (/bin/bash). The second line
demonstrates how comments are made in scripts. This provides you with
more information about what the script does. The remaining lines contain
the loop you created above. You can create this file in the same
directory you’ve been using for the lesson and by using the text editor
of your choice (e.g. nano) but when you save the file, make sure it has
the extension .sh
(e.g. my_first_bash_script.sh). When you’ve done this, you
can run the Bash script by typing the command bash and the file name via
the command line (e.g. bash my_first_bash_script.sh).
#!/bin/bash
# This script loops through .txt files, returns the file name, first line, and last line of the file
for file in *.txt
do
	echo $file
	head -n 1 $file
	tail -n 1 $file
done
Download/copy my_first_bash_script.sh. For more on Bash scripts, see Bash Scripting Tutorial - Ryans Tutorials.
Content from Counting and mining with the shell
Last updated on 2024-05-07 | Edit this page
Overview
Questions
- How can I count data?
- How can I find data within files?
- How can I combine existing commands to do new things?
Objectives
- Demonstrate counting lines, words, and characters with the shell command wc and appropriate flags
- Use strings to mine files and extract matched lines with the shell
- Create complex single line commands by combining shell commands and regular expressions to mine files
- Redirect a command’s output to a file.
- Process a file instead of keyboard input using redirection.
- Construct command pipelines with two or more stages.
- Explain Unix’s ‘small pieces, loosely joined’ philosophy.
Counting and mining data
Now that you know how to navigate the shell, we will move onto learning how to count and mine data using a few of the standard shell commands. While these commands are unlikely to revolutionise your work by themselves, they’re very versatile and will add to your foundation for working in the shell and for learning to code. The commands also replicate the sorts of uses library users might make of library data.
Counting and sorting
We will begin by counting the contents of files using the Unix shell. We can use the Unix shell to quickly generate counts from across files, something that is tricky to achieve using the graphical user interfaces of standard office suites.
Let’s start by navigating to the directory that contains our data
using the cd command:
Remember, if at any time you are not sure where you are in your
directory structure, use the pwd command to find out:
OUTPUT
/Users/riley/Desktop/shell-lessonAnd let’s check what files are in the directory and how large they
are with ls -lhS:
OUTPUT
total 139M
-rw-rw-r-- 1 riley staff 126M Jun 10  2015 2014-01_JA.tsv
-rw-r--r-- 1 riley staff 7.4M Jan 31 18:47 2014-01-31_JA-america.tsv
-rw-r--r-- 1 riley staff 3.6M Jan 31 18:47 2014-01-31_JA-africa.tsv
-rw-r--r-- 1 riley staff 1.4M Jan 31 18:47 2014-02-02_JA-britain.tsv
-rw-r--r-- 1 riley staff 598K Jan 31 18:47 gulliver.txt
-rw-r--r-- 1 riley staff 583K Feb  1 22:53 33504-0.txt
drwxr-xr-x 2 riley staff   68 Feb  2 00:58 backup
In this episode we’ll focus on the dataset
2014-01_JA.tsv, that contains journal article metadata, and
the three .tsv files derived from the original dataset.
Each of these three .tsv files includes all data where a
keyword such as africa or america appears in
the ‘Title’ field of 2014-01_JA.tsv.
CSV and TSV Files
CSV (Comma-separated values) is a common plain text format for
storing tabular data, where each record occupies one line and the values
are separated by commas. TSV (Tab-separated values) is the same except
that values are separated by tabs rather than commas. Confusingly, CSV
is sometimes used to refer to both CSV, TSV and variations of them. The
simplicity of the formats make them great for exchange and archival.
They are not bound to a specific program (unlike Excel files, say, there
is no CSV program, just lots and lots of programs that
support the format, including Excel by the way.), and you wouldn’t have
any problems opening a 40 year old file today if you came across
one.
First, let’s have a look at the largest data file, using the tools we learned in Reading files:
Like 829-0.txt before, the whole dataset cascades by and
can’t really make any sense of that amount of text. To cancel this
on-going concatenation, or indeed any process in the Unix
shell, press Ctrl+C.
In most data files a quick glimpse of the first few lines already tells us a lot about the structure of the dataset, for example the table/column headers:
OUTPUT
File    Creator    Issue    Volume    Journal    ISSN    ID    Citation    Title    Place    Labe    Language    Publisher    Date
History_1a-rdf.tsv  Doolittle, W. E.  1 59  KIVA -ARIZONA-  0023-1940 (Uk)RN001571862 KIVA -ARIZONA- 59(1), 7-26. (1993)  A Method for Distinguishing between Prehistoric and Recent Water and Soil Control Features  xxu eng ARIZONA ARCHAEOLOGICAL AND HISTORICAL SOCIETY 1993
History_1a-rdf.tsv  Nelson, M. C. 1 59  KIVA -ARIZONA-  0023-1940 (Uk)RN001571874 KIVA -ARIZONA- 59(1), 27-48. (1993) Classic Mimbres Land Use in the Eastern Mimbres Region, Southwestern New Mexico xxu eng ARIZONA ARCHAEOLOGICAL AND HISTORICAL SOCIETY 1993
In the header, we can see the common metadata fields of academic
papers: Creator, Issue, Citation,
etc.
Next, let’s learn about a basic data analysis tool: wc
is the “word count” command: it counts the number of lines, words, and
bytes. Since we love the wildcard operator, let’s run the command
wc *.tsv to get counts for all the .tsv files
in the current directory (it takes a little time to complete):
OUTPUT
    13712    511261   3773660 2014-01-31_JA-africa.tsv
    27392   1049601   7731914 2014-01-31_JA-america.tsv
   507732  17606310 131122144 2014-01_JA.tsv
     5375    196999   1453418 2014-02-02_JA-britain.tsv
   554211  19364171 144081136 total
The first three columns contains the number of lines, words and bytes.
If we only have a handful of files to compare, it might be faster or more convenient to check with Microsoft Excel, OpenRefine or your favourite text editor, but when we have tens, hundreds or thousands of documents, the Unix shell has a clear speed advantage. The real power of the shell comes from being able to combine commands and automate tasks, though. We will touch upon this slightly.
For now, we’ll see how we can build a simple pipeline to find the
shortest file in terms of number of lines. We start by adding the
-l flag to get only the number of lines, not the number of
words and bytes:
OUTPUT
    13712 2014-01-31_JA-africa.tsv
    27392 2014-01-31_JA-america.tsv
   507732 2014-01_JA.tsv
     5375 2014-02-02_JA-britain.tsv
   554211 total
The wc command itself doesn’t have a flag to sort the
output, but as we’ll see, we can combine three different shell commands
to get what we want.
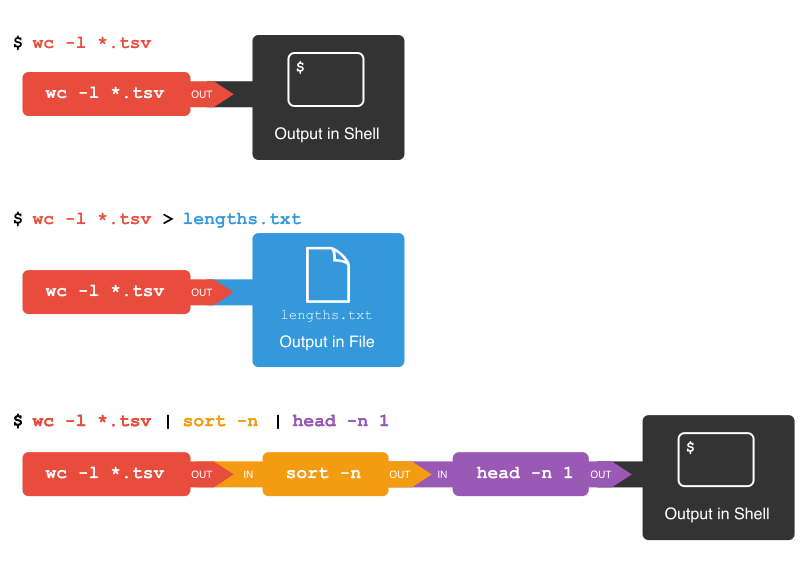
First, we have the wc -l *.tsv command. We will save the
output from this command in a new file. To do that, we redirect
the output from the command to a file using the ‘greater than’ sign
(>), like so:
There’s no output now since the output went into the file
lengths.txt, but we can check that the output indeed ended
up in the file using cat or less (or Notepad
or any text editor).
OUTPUT
    13712 2014-01-31_JA-africa.tsv
    27392 2014-01-31_JA-america.tsv
   507732 2014-01_JA.tsv
     5375 2014-02-02_JA-britain.tsv
   554211 total
Next, there is the sort command. We’ll use the
-n flag to specify that we want numerical sorting, not
lexical sorting, we output the results into yet another file, and we use
cat to check the results:
OUTPUT
     5375 2014-02-02_JA-britain.tsv
    13712 2014-01-31_JA-africa.tsv
    27392 2014-01-31_JA-america.tsv
   507732 2014-01_JA.tsv
   554211 total
Finally we have our old friend head, that we can use to
get the first line of the sorted-lengths.txt:
OUTPUT
5375 2014-02-02_JA-britain.tsvBut we’re really just interested in the end result, not the
intermediate results now stored in lengths.txt and
sorted-lengths.txt. What if we could send the results from
the first command (wc -l *.tsv) directly to the next
command (sort -n) and then the output from that command to
head -n 1? Luckily we can, using a concept called pipes. On
the command line, you make a pipe with the vertical bar character
|. Let’s try with one pipe first:
OUTPUT
     5375 2014-02-02_JA-britain.tsv
    13712 2014-01-31_JA-africa.tsv
    27392 2014-01-31_JA-america.tsv
   507732 2014-01_JA.tsv
   554211 total
Notice that this is exactly the same output that ended up in our
sorted-lengths.txt earlier. Let’s add another pipe:
OUTPUT
5375 2014-02-02_JA-britain.tsvIt can take some time to fully grasp pipes and use them efficiently, but it’s a very powerful concept that you will find not only in the shell, but also in most programming languages.
Pipes and Filters
This simple idea is why Unix has been so successful. Instead of
creating enormous programs that try to do many different things, Unix
programmers focus on creating lots of simple tools that each do one job
well, and that work well with each other. This programming model is
called “pipes and filters”. We’ve already seen pipes; a filter is a
program like wc or sort that transforms a
stream of input into a stream of output. Almost all of the standard Unix
tools can work this way: unless told to do otherwise, they read from
standard input, do something with what they’ve read, and write to
standard output.
The key is that any program that reads lines of text from standard input and writes lines of text to standard output can be combined with every other program that behaves this way as well. You can and should write your programs this way so that you and other people can put those programs into pipes to multiply their power.
Count the number of words, sort and print (faded example)
To count the total lines in every tsv file, sort the
results and then print the first line of the file we use the
following:
Now let’s change the scenario. We want to know the 10 files that
contain the most words. Check the manual for the
wc command (either using man wc or
wc --help) to see if you can find out what flag to use to
print out the number of words (but not the number of lines and bytes).
Fill in the blanks below to count the words for each file, put them into
order, and then make an output of the 10 files with the most words
(Hint: The sort command sorts in ascending order by default).
From man wc, you will see that there is a
-w flag to print the number of words:
OUTPUT
     -w      The number of words in each input file is written to the standard
             output.
So to print the word counts of the .tsv files:
OUTPUT
  511261 2014-01-31_JA-africa.tsv
 1049601 2014-01-31_JA-america.tsv
17606310 2014-01_JA.tsv
  196999 2014-02-02_JA-britain.tsv
19364171 total
And to sort the lines numerically:
OUTPUT
  196999 2014-02-02_JA-britain.tsv
  511261 2014-01-31_JA-africa.tsv
 1049601 2014-01-31_JA-america.tsv
17606310 2014-01_JA.tsv
19364171 total
Mining or searching
Searching for something in one or more files is something we’ll often
need to do, so let’s introduce a command for doing that:
grep (short for global regular expression
print). As the name suggests, it supports regular expressions
and is therefore only limited by your imagination, the shape of your
data, and - when working with thousands or millions of files - the
processing power at your disposal.
To begin using grep, first navigate to the
shell-lesson directory if not already there. Then create a
new directory “results”:
Now let’s try our first search:
Remember that the shell will expand *.tsv to a list of
all the .tsv files in the directory. grep will
then search these for instances of the string “1999” and print the
matching lines.
Press the up arrow once in order to cycle back to your most recent
action. Amend grep 1999 *.tsv to
grep -c 1999 *.tsv and press enter.
OUTPUT
2014-01-31_JA-africa.tsv:804
2014-01-31_JA-america.tsv:1478
2014-01_JA.tsv:28767
2014-02-02_JA-britain.tsv:284
The shell now prints the number of times the string 1999 appeared in each file. If you look at the output from the previous command, this tends to refer to the date field for each journal article.
We will try another search:
OUTPUT
2014-01-31_JA-africa.tsv:20
2014-01-31_JA-america.tsv:34
2014-01_JA.tsv:867
2014-02-02_JA-britain.tsv:9
We got back the counts of the instances of the string
revolution within the files. Now, amend the above command
to the below and observe how the output of each is different:
OUTPUT
2014-01-31_JA-africa.tsv:118
2014-01-31_JA-america.tsv:1018
2014-01_JA.tsv:9327
2014-02-02_JA-britain.tsv:122
This repeats the query, but prints a case insensitive count
(including instances of both revolution and
Revolution and other variants). Note how the count has
increased nearly 30 fold for those journal article titles that contain
the keyword ‘america’. As before, cycling back and adding
> results/, followed by a filename (ideally in .txt
format), will save the results to a data file.
So far we have counted strings in files and printed to the shell or
to file those counts. But the real power of grep comes in
that you can also use it to create subsets of tabulated data (or indeed
any data) from one or multiple files.
This script looks in the defined files and prints any lines
containing revolution (without regard to case) to the
shell. We let the shell add today’s date to the filename:
This saves the subsetted data to a new file.
However, if we look at this file, it contains every instance of the
string ‘revolution’ including as a single word and as part of other
words such as ‘revolutionary’. This perhaps isn’t as useful as we
thought… Thankfully, the -w flag instructs
grep to look for whole words only, giving us greater
precision in our search.
This script looks in both of the defined files and exports any lines
containing the whole word revolution (without regard to
case) to the specified .tsv file.
We can show the difference between the files we created.
OUTPUT
   10585 2016-07-19_JAi-revolution.tsv
    7779 2016-07-19_JAiw-revolution.tsv
18364 totalUsing date --help (on Git Bash for Windows or Linux) or
man date (on macOS or Linux) will show you that the
+ option introduces a date format, where %Y,
%m and %d are replaced by the year, month, and
day respectively. There are many other percent-codes you could use.
You might also see that -I is short for --iso-8601, which
essentially avoids the confusion between the European and American date
formats DD.MM.YYYY and MM/DD/YYYY.
Finally, we’ll use the regular expression syntax covered earlier to search for similar words.
Basic, extended, and PERL-compatible regular expressions
There are, unfortunately, different
ways of writing regular expressions. Across its various versions,
grep supports “basic”, at least two types of “extended”,
and “PERL-compatible” regular expressions. This is a common cause of
confusion, since most tutorials, including ours, teach regular
expressions compatible with the PERL programming language, but
grep uses basic by default. Unless you want to remember the
details, make your life easy by always using the most advanced regular
expressions your version of grep supports (-E
flag on macOS X, -P on most other platforms) or when doing
something more complex than searching for a plain string.
The regular expression ‘fr[ae]nc[eh]’ will match “france”, “french”, but also “frence” and “franch”. It’s generally a good idea to enclose the expression in single quotation marks, since that ensures the shell sends it directly to grep without any processing (such as trying to expand the wildcard operator *).
The shell will print out each matching line.
We include the -o flag to print only the matching part
of the lines e.g. (handy for isolating/checking results):
Pair up with your neighbor and work on these exercises:
Searching with regular expressions
Use regular expressions to find all ISSN numbers (four digits
followed by hyphen followed by four digits) in
2014-01_JA.tsv and print the results to a file
results/issns.tsv. Note that you might have to use the
-E flag (or -P with some versions of
grep, e.g. with Git Bash on Windows).
or
It is worth checking the file to make sure grep has
interpreted the pattern correctly. You could use the less
command for this.
The -o flag means that only the ISSN itself is printed
out, instead of the whole line.
If you came up with something more advanced, perhaps including word boundaries, please share your result in the collaborative document and give yourself a pat on the shoulder.
Finding unique values
If you pipe something to the uniq command, it will
filter out adjacent duplicate lines. In order for the ‘uniq’ command to
only return unique values though, it needs to be used with the ‘sort’
command. Try piping the output from the command in the last exercise to
sort and then piping these results to ‘uniq’ and then
wc -l to count the number of unique ISSN values.
Using a Loop to Count Words
We will now use a loop to automate the counting of certain words
within a document. For this, we will be using the Little
Women e-book from Project
Gutenberg. The file is inside the shell-lesson folder
and named pg514.txt. Let’s rename the file to
littlewomen.txt.
$ mv pg514.txt littlewomen.txtThis renames the file to something easier to remember.
Now let’s create our loop. In the loop, we will ask the computer to go through the text, looking for each girl’s name, and count the number of times it appears. The results will print to the screen.
BASH
$ for name in "Jo" "Meg" "Beth" "Amy"
> do
>    echo "$name"
>    grep -wo "$name" littlewomen.txt | wc -l
> done
OUTPUT
Jo
1355
Meg
683
Beth
459
Amy
645
What is happening in the loop?
-
echo "$name"is printing the current value of$name -
grep "$name" littlewomen.txtfinds each line that contains the value stored in$name. The-wflag finds only the whole word that is the value stored in$nameand the-oflag pulls this value out from the line it is in to give you the actual words to count as lines in themselves. - The output from the
grepcommand is redirected with the pipe,|(without the pipe and the rest of the line, the output fromgrepwould print directly to the screen) -
wc -lcounts the number of lines (because we used the-lflag) sent fromgrep. Becausegreponly returned lines that contained the value stored in$name,wc -lcorresponds to the number of occurrences of each girl’s name.
Why are the variables double-quoted here?
In episode 4 we learned to use
"$..."as a safeguard against white-space being misinterpreted. Why could we omit the"-quotes in the above example?What happens if you add
"Louisa May Alcott"to the first line of the loop and remove the"from$namein the loop’s code?
Because we are explicitly listing the names after
in, and those contain no white-space. However, for consistency it’s better to use rather once too often than once too rarely.Without
"-quoting$name, the last loop will try to executegrep Louisa May Alcott littlewomen.txt.grepinterprets only the first word as the search pattern, butMayandAlcottas filenames. This produces two errors and a possibly untrustworthy count:
Selecting columns from our article dataset
When you receive data it will often contain more columns or variables
than you need for your work. If you want to select only the columns you
need for your analysis, you can use the cut command to do
so. cut is a tool for extracting sections from a file. For
instance, say we want to retain only the Creator,
Volume, Journal, and Citation
columns from our article data. With cut we’d:
OUTPUT
Creator	Volume	Journal	Citation
Doolittle, W. E.  59  KIVA -ARIZONA-  KIVA -ARIZONA- 59(1), 7-26. (1993)
Nelson, M. C.	59	KIVA -ARIZONA-	KIVA -ARIZONA- 59(1), 27-48. (1993)
Deegan, A. C.	59	KIVA -ARIZONA-	KIVA -ARIZONA- 59(1), 49-64. (1993)
Stone, T.	59	KIVA -ARIZONA-	KIVA -ARIZONA- 59(1), 65-82. (1993)
Adams, W. Y.	1	NORTHEAST AFRICAN STUDIES	NORTHEAST AFRICAN STUDIES 1(2/3), 7-18. (1994)
Beswick, S. F.	1	NORTHEAST AFRICAN STUDIES	NORTHEAST AFRICAN STUDIES 1(2/3), 19-48. (1994)
Cheeseboro, A. Q.	1	NORTHEAST AFRICAN STUDIES	NORTHEAST AFRICAN STUDIES 1(2/3), 49-74. (1994)
Duany, W.	1	NORTHEAST AFRICAN STUDIES	NORTHEAST AFRICAN STUDIES 1(2/3), 75-102. (1994)
Mohamed Ibrahim Khalil	1	NORTHEAST AFRICAN STUDIES	NORTHEAST AFRICAN STUDIES 1(2/3), 103-118. (1994)
Above we used cut and the -f flag to
indicate which columns we want to retain. cut works on tab
delimited files by default. We can use the flag -d to
change this to a comma, or semicolon or another delimiter. If you are
unsure of your column position and the file has headers on the first
line, we can use head -n 1 <filename> to print those
out.
First, let’s see where our desired columns are:
OUTPUT
File Creator Issue Volume Journal ISSN ID Citation Title Place Labe Language Publisher DateOk, now we know Issue is column 3, Volume
4, Language 11, and Publisher 12. We use these
positional column numbers to construct our cut command:
cut -f 3,4,11,12 2014-01_JA.tsv > 2014-01_JA_ivlp.tsvWe can confirm this worked by running head on the file:
head 2014-01_JA_ivlp.tsvOUTPUT
Issue	Volume	Language	Publisher
1	59	eng	ARIZONA ARCHAEOLOGICAL AND HISTORICAL SOCIETY
1	59	eng	ARIZONA ARCHAEOLOGICAL AND HISTORICAL SOCIETY
1	59	eng	ARIZONA ARCHAEOLOGICAL AND HISTORICAL SOCIETY
1 59 eng ARIZONA ARCHAEOLOGICAL AND HISTORICAL SOCIETYContent from Working with free text
Last updated on 2024-06-05 | Edit this page
Overview
Questions
- How do we work with complex files?
Objectives
- Use shell tools to clean and transform free text
Working with free text
So far we have looked at how to use the Unix shell to manipulate, count, and mine tabulated data. Some library data, especially digitised documents, is much messier than tabular metadata. Nonetheless, many of the same techniques can be applied to non-tabulated data such as free text. We need to think carefully about what it is we are counting and how we can get the best out of the Unix shell.
Thankfully there are plenty of folks out there doing this sort of work and we can borrow what they do as an introduction to working with these more complex files. So for this final exercise we’re going to leap forward a little in terms of difficulty to a scenario where we won’t learn about everything that is happening in detail or discuss at length each command. We’re going to prepare and pull apart texts to demonstrate some of the potential applications of the Unix shell. And where commands we’ve learnt about are used, I’ve left some of the figuring out to do to you - so please refer to your notes if you get stuck!
Before going any further, speak to the person next to you and choose which type of text you’d like to work on together. You have three options:
- Option 1: An example of hand transcribed text: Gulliver’s Travels (1735)
- Option 2: An example of text captured by an optical character recognition process: General Report on the Physiography of Maryland. A dissertation, etc. (Reprinted from Report of Maryland State Weather Service.) [With maps and illustrations.] 1898 (Retrieved from doi.org/10.21250/db12)
- Option 3: An example of a webpage: Piper’s World (a GeoCities page from 1999 saved at archive.org)
Option 1: Hand transcribed text
Grabbing a text, cleaning it up
We’re going to work with the gulliver.txt file, which we
made in Episode 3,
‘Working with files and directories’. You should (still) be working
in the shell-lesson directory.
Let’s look at the file.
OUTPUT
      1 <U+FEFF>The Project Gutenberg eBook, Gulliver's Travels, by Jonatha
      1 n Swift
      2
      3
      4 This eBook is for the use of anyone anywhere at no cost and with
      5 almost no restrictions whatsoever.  You may copy it, give it away o
      5 r
      6 re-use it under the terms of the Project Gutenberg License included
      7 with this eBook or online at www.gutenberg.org
      8
      9
     10
     11
     12
     13 Title: Gulliver's Travels
     14        into several remote nations of the world
     15
     16
     17 Author: Jonathan Swift
     18
     19
     20
     21 Release Date: June 15, 2009  [eBook #829]
     22
     23 Language: English
     24
     25 Character set encoding: UTF-8
     26
     27
     28 ***START OF THE PROJECT GUTENBERG EBOOK GULLIVER'S TRAVELS***
     29
     30
     31 Transcribed from the 1892 George Bell and Sons edition by David Pri
     31 ce,
     32 email ccx074@pglaf.org
     33
     34
     35
We’re going to start by using the sed command. The
command allows you to edit files directly.
The command sed in combination with the d
value will look at gulliver.txt and delete all values
between the rows specified. The > action then prompts
the script to this edited text to the new file specified.
This does the same as before, but for the header.
You now have a cleaner text. The next step is to prepare it even further for rigorous analysis.
We now use the tr command, used for translating or
deleting characters. Type and run:
This uses the translate command and a special syntax to remove all
punctuation ([:punct:]) and carriage returns
(\r). It also requires the use of both the output redirect
> we have seen and the input redirect <
we haven’t seen.
Finally regularise the text by removing all the uppercase lettering.
Open the gulliver-clean.txt in a text editor. Note how
the text has been transformed ready for analysis.
Pulling a text apart, counting word frequencies
We are now ready to pull the text apart.
Here we’ve made extended use of the pipes we saw in Counting and mining with the shell.
The first part of this script uses the translate command again, this
time to translate every blank space into \n which renders
as a new line. Every word in the file will at this stage have its own
line.
The second part uses the sort command to rearrange the
text from its original order into an alphabetical configuration.
The third part uses uniq, another new command, in
combination with the -c flag to remove duplicate lines and
to produce a word count of those duplicates.
The fourth and final part sorts the text again by the counts of duplicates generated in step three.
Challenge
There are still some remaining punctuation marks in the text. They
are called ‘smart’ or ‘curly’ quotes. Can you remove them using
sed?
Hint: These quote marks are not among the 128 characters of the ASCII
standard, so in the file they are encoded using a different standard,
UTF-8. While this is no problem for sed, the window you are
typing into may not understand UTF-8. If so you will need to use a Bash
script; we encountered these at the end of episode 4, ‘Automating the
tedious with loops’.
As a reminder, use the text editor of your choice to write a file that looks like this:
BASH
#!/bin/bash
# This script removes quote marks from gulliver-clean.txt and saves the result as gulliver-noquotes.txt
(replace this line with your solution)
Save the file as remove-quotes.sh and run it from the
command line like this:
BASH
#!/bin/bash
# This script removes quote marks from gulliver-clean.txt and saves the result as gulliver-noquotes.txt
sed -Ee 's/[""‘']//g' gulliver-clean.txt > gulliver-noquotes.txt
If this doesn’t work for you, you might need to check whether your text editor can save files using the UTF-8 encoding.
We have now taken the text apart and produced a count for each word
in it. This is data we can prod and poke and visualise, that can form
the basis of our investigations, and can compare with other texts
processed in the same way. And if we need to run a different set of
transformation for a different analysis, we can return to
gulliver-clean.txt to start that work.
And all this using a few commands on an otherwise unassuming but very powerful command line.
Option 2: Optical character recognised text
Grabbing a text, cleaning it up
We’re going to work with 201403160_01_text.json.
Let’s look at the file.
OUTPUT
      1 [[1, ""], [2, ""], [3, ""], [4, ""], [5, ""], [6, ""], [7, "A GENERAL RE
      1 PORT ON THE PHYSIOGRAPHY OF MARYLAND A DISSERTATION PRESENTED TO THE PRE
      1 SIDENT AND FACULTY OF THE JOHNS HOPKINS UNIVERSITY FOR THE DEGREE OF DOC
      1 TOR OF PHILOSOPHY BY CLEVELAND ABBE, Jr. BALTIMORE, MD. MAY, 1898."], [8
      1 , ""], [9, ""], [10, "A MAP S H OW I N G THE PHYSIOGRAPHIC PROVINCES OF
      1 MARYLAND AND Their Subdivisions Scale 1 : 2,000.000. 32 Miles-1 Inch"],
      1 [11, "A GENERAL REPORT ON THE PHYSIOGRAPHY OF MARYLAND A DISSERTATION PR
      1 ESENTED TO THE PRESIDENT AND FACULTY OF THE JOHNS HOPKINS UNIVERSITY FOR
      1  THE DEGREE OF DOCTOR OF PHILOSOPHY BY CLEVELAND ABBE, Jr. BALTIMORE, MD
      1 . MAY, 1898."], [12, "PRINTED BY tL%t jfricbcnrtxifti Compang BALTIMORE,
      1  MD., U. S. A. REPRINTED FROM Report of Maryland State Weather Service,
      1 Vol. 1, 1899, pp. 41-216."], [13, "A GENERAL REPORT ON THE PHYSIOGRAPHY
      1 OF MARYLAND Physiographic Processes. INTRODUCTION. From the earliest tim
      1 es men have observed more or less closely the various phenomena which na
      1 ture presents, and have sought to find an explanation for them. Among th
      1 e most interesting of these phe nomena have been those which bear on the
      1  development of the sur face features of the earth or its topography. Im
      1 pressed by the size and grandeur of the mountains, their jagged crests a
      1 nd scarred sides, early students of geographical features were prone to
      1 ascribe their origin to great convulsions of the earth's crust, earthqua
      1 kes and vol canic eruptions. One generation after another comes and goes
      1 , yet the mountains continue to rear their heads to the same heights, th
      1 e rivers to run down the mountain sides in the same courses and follow t
We’re going to start by using the tr command, used for
translating or deleting characters. Type and run:
This uses the translate command and a special syntax to remove all
punctuation. It also requires the use of both the output redirect
> we have seen and the input redirect <
we haven’t seen.
Finally regularise the text by removing all the uppercase lettering.
Open the 201403160_01_text-clean.txt in a text editor.
Note how the text has been transformed ready for analysis.
Pulling a text apart, counting word frequencies
We are now ready to pull the text apart.
BASH
$ tr ' ' '\n' < 201403160_01_text-clean.txt | sort | uniq -c | sort -nr > 201403160_01_text-final.txtHere we’ve made extended use of the pipes we saw in Counting and mining with the shell.
The first part of this script uses the translate command again, this
time to translate every blank space into \n which renders
as a new line. Every word in the file will at this stage have its own
line.
The second part uses the sort command to rearrange the
text from its original order into an alphabetical configuration.
The third part uses uniq, another new command, in
combination with the -c flag to remove duplicate lines and
to produce a word count of those duplicates.
The fourth and final part sorts the text again by the counts of duplicates generated in step three.
Note: your final output will have one problem - not all the words counted are real words (see the words counted only 1 or 2 times). To better understand what has happened, search online to find out more about Optical Character Recognition of texts
Either way we have now taken the text apart and produced a count for
each word in it. This is data we can prod and poke and visualise, that
can form the basis of our investigations, and can compare with other
texts processed in the same way. And if we need to run a different set
of transformation for a different analysis, we can return to
201403160_01_text-clean.txt to start that work.
And all this using a few commands on an otherwise unassuming but very powerful command line.
Option 3: A webpage
Grabbing a text, cleaning it up
We’re going to work with diary.html.
Let’s look at the file.
OUTPUT
      1 <!-- This document was created with HomeSite v2.5 -->
      2 <!DOCTYPE HTML PUBLIC "-//W3C//DTD HTML 3.2//EN">
      3 <html>
      4
      5 <head>
      6
      7
      8 <script type="text/javascript" src="/static/js/analytics.js"></script>
      9 <script type="text/javascript">archive_analytics.values.server_name="www
      9 b-app6.us.archive.org";archive_analytics.values.server_ms=105;</script>
     10 <link type="text/css" rel="stylesheet" href="/static/css/banner-styles.c
     10 ss"/>
     11
     12
     13 <title>Piper's Diary</title>
     14 <meta name="description"
     15 content="Come visit our shih tzu, Piper.  He has his very own photo gall
     15 ary, monthly diary, newsletter, and dog site award.  He also maintains d
     15 og book reviews and quotations.  Come check him out!">
     16 <meta name="keywords"
     17 content="shih tzu, dog, pet, quotations, award, diary, advice, book, rev
     17 iew, piper">
     18 <style TYPE="text/css" TITLE="Basic Fonts">
We’re going to start by using the sed command. The
command allows you to edit files directly.
The command sed in combination with the d
value will look at diary.html and delete all values between
the rows specified. The > action then prompts the script
to this edited text to the new file specified.
This does the same as before, but for the header.
You now have a cleaner text. The next step is to prepare it even further for rigorous analysis.
First we wil remove all the html tags. Type and run:
Here we are using a regular expression (see the Library
Carpentry regular expression lesson to find all valid html tags
(anything within angle brackets) and delete them). This is a complex
regular expression, so don’t worry too much about how it works! The
script also requires the use of both the output redirect
> we have seen and the input redirect <
we haven’t seen.
We’re going to start by using the tr command, used for
translating or deleting characters. Type and run:
This uses the translate command and a special syntax to remove all
punctuation ([:punct:]) and carriage returns
(\r).
Finally regularise the text by removing all the uppercase lettering.
Open the diary-clean.txt in a text editor. Note how the
text has been transformed ready for analysis.
Pulling a text apart, counting word frequencies
We are now ready to pull the text apart.
Here we’ve made extended use of the pipes we saw in Counting and mining with the shell.
The first part of this script uses the translate command again, this
time to translate every blank space into \n which renders
as a new line. Every word in the file will at this stage have its own
line.
The second part uses the sort command to rearrange the
text from its original order into an alphabetical configuration.
The third part uses uniq, another new command, in
combination with the -c flag to remove duplicate lines and
to produce a word count of those duplicates.
The fourth and final part sorts the text again by the counts of duplicates generated in step three.
We have now taken the text apart and produced a count for each word
in it. This is data we can prod and poke and visualise, that can form
the basis of our investigations, and can compare with other texts
processed in the same way. And if we need to run a different set of
transformation for a different analysis, we can return to
diary-final.txt to start that work.
And all this using a few commands on an otherwise unassuming but very powerful command line.
Where to go next
- Deborah S. Ray and Eric J. Ray, Unix and Linux: visual quickstart guide, 4th edition (2009). Invaluable (and not expensive) as a reference guide - especially if you only use the command line sporadically!
- The Command Line Crash Course. ‘Learn UNIX the Hard Way’ – good for reminders of the basics.
- Automate the Boring Stuff.
- Another Coursera course, Programming for Everybody (Python) is available and lasts 10 weeks, if you have 2-4 hours to spare per week. Python is popular in research programming as it is readable, relatively simple, and very powerful.
- Bill Turkel and the Digital History community more broadly. The second lesson you did today was based on a lesson Bill has on his website and Bill is also a general editor of the Programming Historian. The Programming Historian is an open, collaborative book aimed at providing programming lessons to historians. Although the lessons are hooked around problems historians have, their lessons - which cover various programming languages - have a wide applicability - indeed today’s course is based on two lessons I wrote with Ian Milligan, an historian at Waterloo, Canada - for ProgHist. Bill also has a wonderful tutorial on ‘Named Entity Recognition with Command Line Tools in Linux’ which I thoroughly recommend if you want to automatically find, markup, and count names, places, and organisations in text files…
Conclusion
In this session you have learned to navigate the Unix shell, to undertake some basic file counting, concatenation and deletion, to query across data for common strings, to save results and derived data, and to prepare textual data for rigorous computational analysis.
This only scratches the surface of what the Unix environment is capable of. It is hoped, however, that this session has provided a taster sufficient to prompt further investigation and productive play.
Keep in mind that the full potential the tools can offer may only emerge upon embedding these skills into real projects. Nonetheless, being able to manipulate, count and mine thousands of files is extremely useful. Even a large collection of files which do not contain any alpha-numeric data elements, such as image files, can be easily sorted, selected and queried depending on the amount of description, of metadata contained in each filename. If not a prerequisite of working with the Unix, then taking the time to structure your data in a consistent and predictable manner is certainly a significant step towards getting the most out of Unix commands. And if you can find a way of using the Unix shell regularly - perhaps only to copy or amend files - you’ll keep the basics fresh, meaning that next time you have cause to use the Unix shell for more complex commands, you shouldn’t need to learn it all over again.
References
- James Baker and Ian Milligan, ‘Counting and mining research data with Unix’, The Programming Historian (2014).
- Ian Milligan and James Baker, ‘Introduction to the Bash Command Line’, The Programming Historian (2014).
- William J. Turkel, ‘Named Entity Recognition with Command Line Tools in Linux’ (30 June 2013). The section ‘NER Demo’ is adapted from this and shared under a Creative Commons Attribution-NonCommercial-ShareAlike 3.0 Unported.
- William J. Turkel, ‘Basic Text Analysis with Command Line Tools in Linux’ (15 June 2013). The sections ‘Grabbing a text, cleaning it up’ and ‘Pulling a text apart, counting word frequencies’ are adapted from this and shared under a Creative Commons Attribution-NonCommercial-ShareAlike 3.0 Unported.